This page contains related questions on Git Integration for Jira app SSH connections in Jira.
Use the FAQ below to find answers to common questions. Feel free to contact our support team ([email protected]) or visit our support portal if you don’t see what you’re looking for.
- Creating and configuring SSH keys (Windows/MacOS/Linux)
- Are passphrases supported on SSH keys?
- Does this app support authenticating to git repositories via SSH?
- How do you configure the SSH key used when adding a new project?
- Why do I need to provide a PRIVATE KEY to the Git Integration for Jira app instead of a PUBLIC KEY?
- How do I configure/connect an SSH remote git repository to Jira?
Creating and configuring SSH keys (Windows/MacOS/Linux)
The Git Integration for Jira app supports SSH git repository connections via Connect Wizard or Git on the Add new integration panel.
As a summary, you need to perform the following tasks in order to successfully integrate your SSH git repositories with Jira:
-
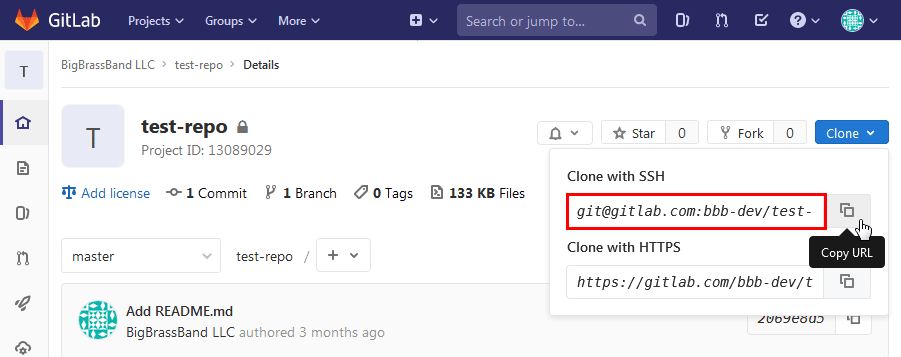
Obtain SSH git repository URL from your git host repository configuration page
-
Generate SSH key pair (public and private key)
-
Add the public key to your git host SSH configuration
-
Add the private key by connecting your SSH git repositories via Git Integration for Jira app.
1. Acquire SSH Git Repository URL

Get the git clone SSH URL from the repository home of the git host that will be used for Jira integration. The above screen represents an example from GitLab.
2. Generate SSH key pair (public and private key)
Do note that when generating the key pair for use with Git Integration for Jira app, the following checklist must be considered:
-
The generated SSH key must not be created using the OpenSSH format. Instead, use the supported certificate format: RSA,
-
Add the private key to Git Integration app and set the public key to your git host.
-
The generated SSH key must use the OpenSSL PEM storage format.
For more information on SSH connection issues, see article SSH key format is invalid.
Linux/MacOs
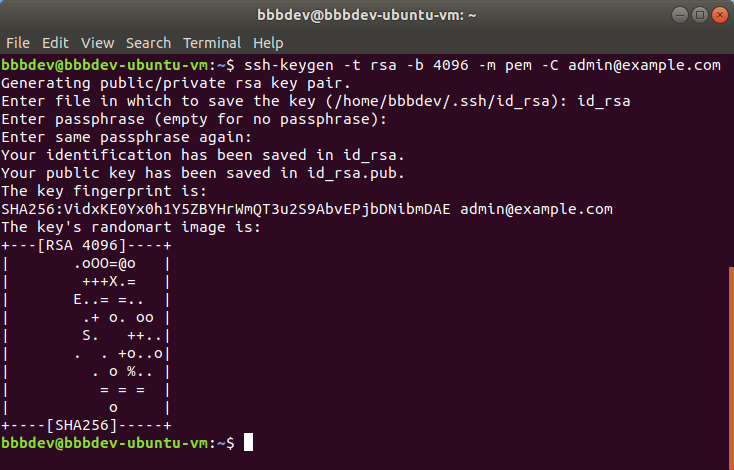
On Linux and MacOS, perform this command in Terminal to generate an SSH key in RSA format:
ssh-keygen -t rsa -b 4096 -m pem -C "[email protected]"MacOS often incorrectly creates an OpenSSH format certificate. For more details, see information on this common problem.

For lost SSH passphrase in Linux, you will need to generate a new SSH key pair. There’s no way to recover it.
For MacOS, if you configured your SSH passphrase with the password manager (Keychain), you may be able to recover it via Keychain Access.
Windows
For Windows, we recommend to use PuTTY and use PuTTYgen to generate key pair for your SSH git repository connection.

-
Launch PuTTYgen and refer to the above image for the rest of the steps on this section.
-
Set the Type of key to generate to RSA.
-
Set the Number of bits in a generated key to 4096.
-
Click Generate.
-
Follow screen instructions such as moving your mouse pointer on random locations on the blank area of the PuTTYgen dialog. Do this until the progress bar completely fills up and the SSH key pair is generated.
-
Entering a Passphrase for the generated key is optional but will ensure a more secure connection.
-
Save your generated public and private keys to a file by clicking the respective options.
-
Copy the generated key. This is the public key that will used on the SSH configuration page of your git host.
-
If you lose your SSH key passphrase, recovering it is impossible. You will need to generate a new SSH key pair and a new passphrase instead.
3. Add the public key to your git host.
-
Login to your git host and go the SSH configuration page (for example, Profile➜ Settings in GitLab or GitHub).
-
Paste the generated public SSH key from PuTTYgen to the provided box.
-
Add this key to complete setting up the public key for SSH git connection for your git host.
4. Add the private key via Git Integration in Jira app.
For the private key, PuTTY creates it in its own “.ppk” format. To convert it to “.pem” format:
-
On PuTTYgen window, go to menu Conversions.
-
Select Export OpenSSH key.
-
Add/upload this file to Git Integration for Jira app ➜ SSH keys or when prompted in connecting SSH git repositories.
Video Guide
Watch the video below to learn more details of the steps outlined above. As a bonus, the video also shows how to connect SSH git repositories to Jira and viewing commits and code diff in Jira issues.
Are passphrases supported on SSH keys?
Passphrases are now supported since v2.x.x of the Git Integration for Jira app.
Does this app support authenticating to git repositories via SSH?
Yes.
OpenSSH is now fully supported.
How do you configure the SSH key used when adding a new project?
SSH keys should be in .ssh folder located in user home (user which is used to run jira).
SSH keys with and without passphrases are supported.
Why do I need to provide a PRIVATE KEY to the Git Integration for Jira app instead of a PUBLIC KEY?
The PRIVATE KEY is needed by the SSH client, which is the Jira server, to connect to the Git server via SSH.
How do I configure/connect an SSH remote git repository to Jira?
In Jira, use the Connect to Git Repository wizard to configure SSH integration with any remote git repositories.
-
Go to Jira dashboard menu Git ➜ Manage repositories. (Alternatively, go to Jira Dashboard menu Jira Administration ➜ Applications). The manage git repositories page is displayed.
-
Click Connect to Git Repository. The Connect to Git Repository wizard appears.
-
Enter the Repository location of your SSH git server. Click Next.
-
Upload the private key or paste it on the provided field. Click Next.
-
Enter Passphrase (if the SSH has one). Click Next.
-
The wizard will start cloning the selected repository. When the process is complete, the Permissions dialog is displayed.
-
Leave settings as is and click Next.
-
Click Finish to complete the setup. The repository is added to the repositories list.
Here’s a video to guide you step-by-step as stated above:
