GitHub offers a variety of integration options, including: API, OAuth, and more recently GitHub Apps. There are a number of benefits to using GitHub app over OAuth:
-
GitHub apps are by nature an organization installation. A separate GitHub account or service user is not required.
-
Because GitHub apps require GitHub administrator authorization, we can rely on the GitHub app having administrator permissions.
-
Determine repository access at the organization or repository level for the integration
-
GitHub apps have a higher rate limit than OAuth.
For more details, see the GitHub Apps article.
New integration options
Two new integration options are added into the Add new integration wizard Connect screen:
-
GitHub App (GitHub.com and GitHub Enterprise Cloud)
-
GitHub Enterprise App (GitHub Enterprise Server)
There are two terms:
-
GitHub Application (GHA) – GHA itself is a set of authorization information. It is created in some GitHub organization during the first step of connecting a GHA integration with the Git Integration for Jira app.
-
Installation of a GitHub Application – To get access to repositories inside the organization, an admin has to install the GHA in the organization. During the installation of GHA, the administrator selects the scope that will be available for this installation of this GHA. It is the second step of connecting a GHA integration.
Permissions
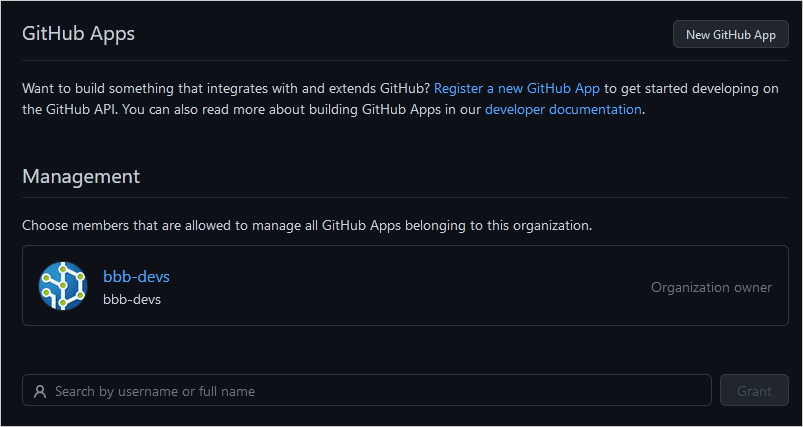
Check GitHub Apps permission for your organization:
-
On your GitHub web portal, go to your organization ➜ Settings tab.
-
On the sidebar, click Developer settings ➜ GitHub Apps.
Pre-requisites
IMPORTANT!
-
As an initial configuration requirement, admins need to install the GHA in an organization. After this setup, only then that Jira instance can read the repositories with Git Integration for Jira app.
-
Establishing a connection using GHA is a two-way process. This requires the Jira instance, where the GHA integration is connected, be accessible remotely from the GitHub server. Make the IP of the Jira instance accessible from the internet as well as add this IP address to the GitHub.com allow list.
Limitations
-
Only one GHA installation is allowed on each GitHub organization. This is because the GHA itself is created each time on the first step of connecting a GHA integration and prevents the reuse of an existing GHA for installing in another organization.
-
The Cancel function on the scope selection page does not do anything and GIJ have no control and cannot affect its behavior. When a user installs a GHA created manually, clicking Cancel redirects back to the GHA page.
-
We advise users against renaming their GHAs. GIJ uses this name for identifying the GHA. However, the GitHub server does not return information about the application rename event. Thus, GIJ has no way to receive any information about the new name. As the result, the
your GitHub applink on the Remove integration page will return a 404 page error if a GHA is renamed.
Integrate to a GitHub App
-
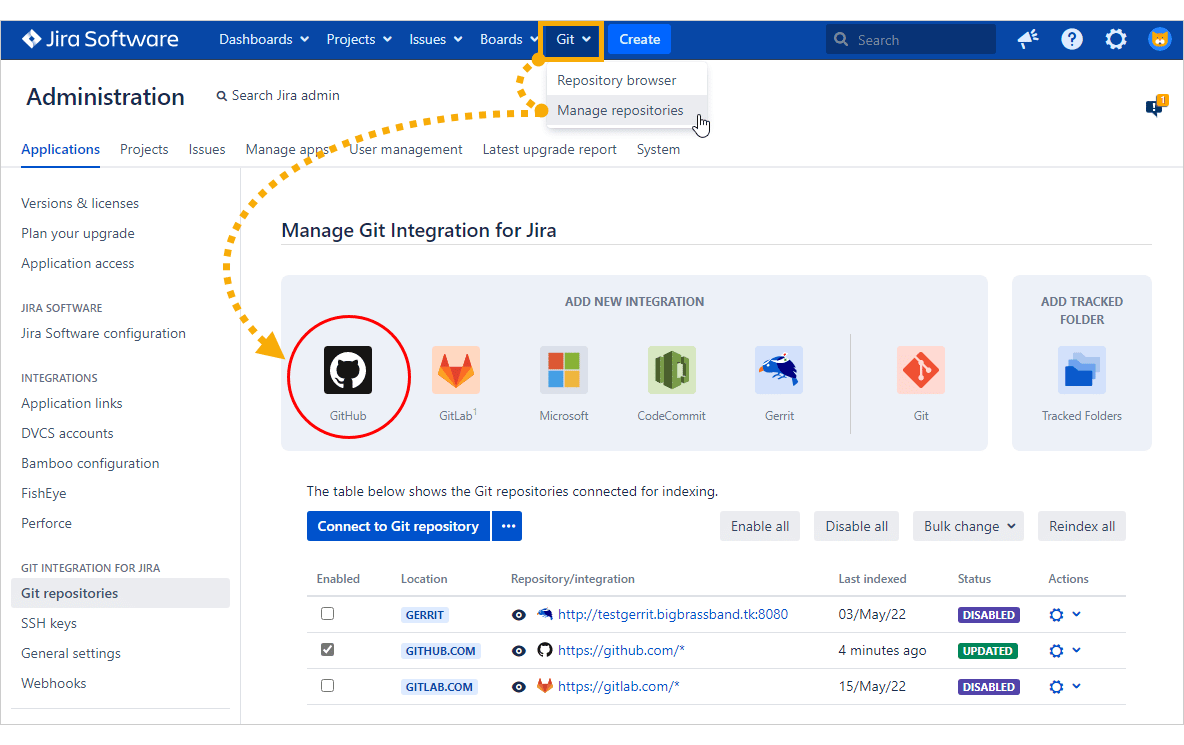
On your Jira dashboard menu, go to Git ➜ Manage repositories.
-
On the Add new integration panel, click GitHub.
-
With GIJ version 4.6+ and later, the GitHub App integration feature is added to the External service list.

-
Pick the integration that conforms to your configuration:
-
GitHub.com and GitHub Enterprise Cloud
-
GitHub Enterprise Server
-
-
Enter Organization name.
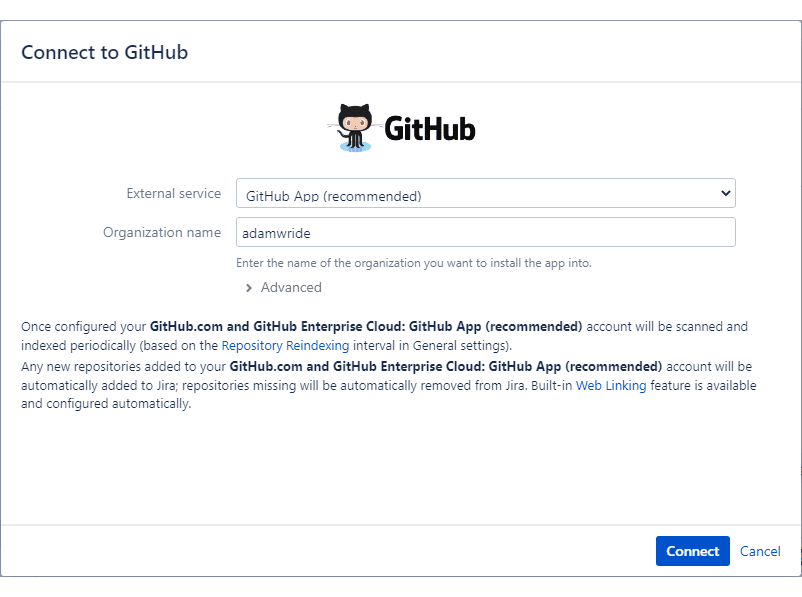
For GHA on GitHub Enterprise Server external service, enter Host URL and Organization name.
-
Click Connect to continue.

-
On the Settings screen, the Require user PAT setting is enabled and cannot be changed because it is directly affected by the Enforce Git service permissions setting in the General settings page. For the GHA feature, the user’s PAT is not mandatory since it can interact with the Git server using the GHA access token.
-
Click Connect to start configuring this GitHub App integration.
The Git Integration for Jira app will perform this task automatically. Provide login credentials if prompted.
-
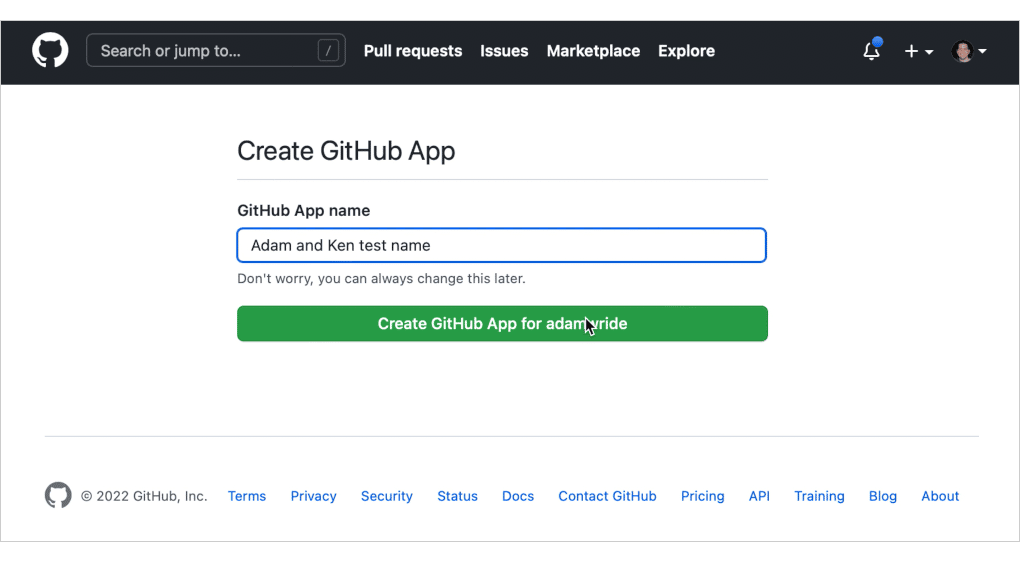
On the following screen, enter a descriptive name for the new GitHub App. (Changing this name later on will have a negative impact on the GHA integration)
-
Click Create GitHub App… to proceed.
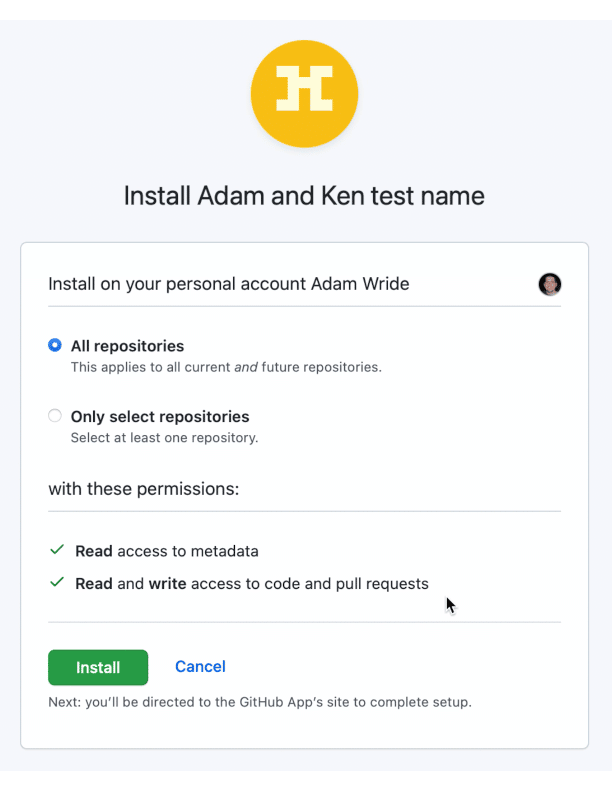
-
Choose:
-
All repositories – to connect all repositories from this organization.
-
Only select repositories – lets you select a specific repository for this setup.
-
-
Click Install to complete this process.
The GitHub App integration is now displayed in the Git repositories configuration list.
Post-install notes
The GHA is created automatically by Git Integration for Jira app. For any related questions, please contact [email protected]
-
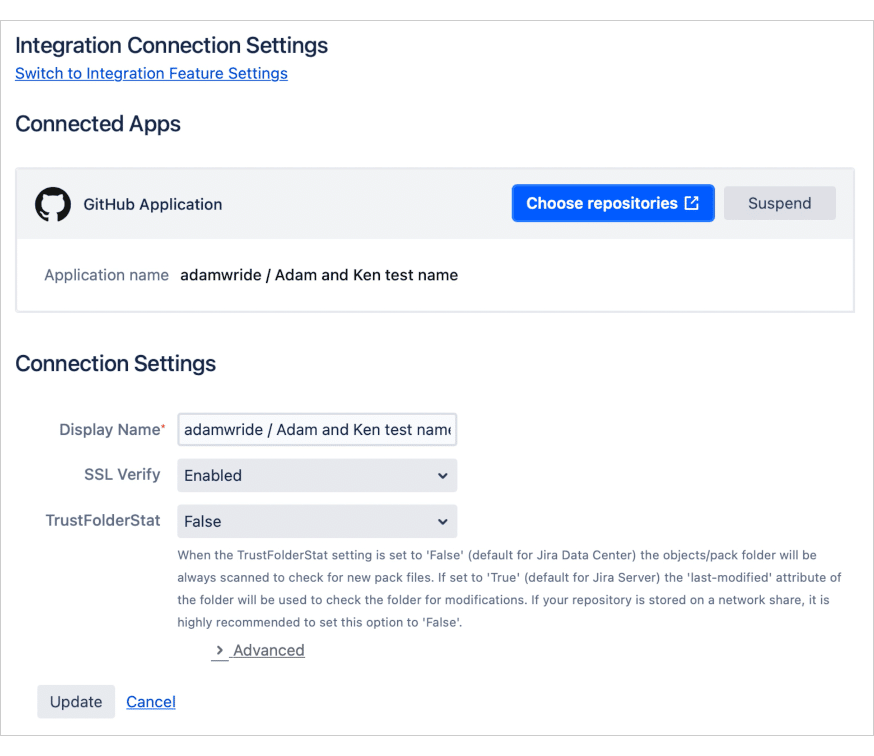
You can reconfigure connected repositories in the Edit integration connection settings page for this GHA integration (
 Actions).
-
Make sure that the following properties must not be changed for this GHA integration:
- GitHub App name
- Post installation
- Webhook attributes
- Private keys
- Any settings on the Permissions and Events page
- Any settings on the installation page
-
Admins can restrict repositories using the JMESpath filter to avoid a case when a user tries to connect thousands of heavy repositories resulting in decreased Jira performance.
-
A GHA installation can be suspended in two ways:
- From the owner side — Press Suspend on the Integration Connection settings for the selected integration via GIJ actions. RECOMMENDED
- From the user side — Press Suspend on the GitHub portal for the GHA installation. NOT RECOMMENDED
-
It is possible to re-issue a PEM key for a GHA on the GitHub server side. However, the only way to update the PEM key of a connected GHA integration is via Bulk Import. Bulk export the GHA integration and then paste the entire PEM key enclosed in double quotes into the .tsv file (to preserve line esc chars).
-
A GHA must be deleted by its owner. If several users have access to Repository Management, only one of them can actually remove the app from the Git server after the GHA integration is removed.
Using alternative URL for GitHub Apps
NEW FEATURE
VERSION 4.27+
The alternative URL will allow GitHub Apps to be configured to make them sending webhooks directly to that URL instead of Jira. In this case, an alternative URL points to a proxy server which stays between GitHub and Jira. This will allow webhook events to be redirected to the alternative URL when Jira is inaccessible from internet, behind a firewall or is running locally.
Setup a new GHA integration by using an alternative URL instead of the original Jira base URL.For now, it can only be called via REST API:
url
http://${originalJiraBaseUrl}/rest/gitplugin/1.0/global-settings
method
POST
content-type
application/json
parameter(s)
{"altJiraBaseUrl": "${alternativeJiraUrlAsString}"}
For example, let’s assume you want to run a Jira standalone instance locally and try or test a GitHub App integration type. In this case, set up the following:
-
The Jira itself which may be accessible from your local instance. For example:
http://localhost:2990. -
The ngrok utility as a proxy on the same machine to forward all incoming requests from the Internet to the local Jira. For instance, it has
https://my.ngrok.comas a publicly available URL, which redirects all requests on tohttp://localhost:2990. -
With Git Integration for Jira app, set up an alternative URL by doing the following call:
curl -X POST http://localhost:2990/jira/rest/gitplugin/1.0/global-settings \
--user admin \
-H "Content-Type: application/json" \
-d '{"altJiraBaseUrl": "https://my.ngrok.com/jira"}'
In order to clean up the altJiraBaseUrl property, just set up it to empty string {"altJiraBaseUrl": ""}.
Troubleshooting GHA integrations
GitHub App integration stuck installation state
A GHA integration may get stuck in INSTALLING status. At the moment, we found three cases when it may happen:
| Case | What happened | What the user can do to remove the integration |
|---|---|---|
| 1 | The integration is waiting for response from a GitHub server | Wait till the GitHub server responds |
| 2 | The GHA was not installed during connecting of the integration | Install the GHA and then remove the integration as usual |
| 3 | The GHA was removed from the GitHub server | Nothing |
If GitHub App integration is stuck on Installing status, use the Remove integration action to remove such integration.
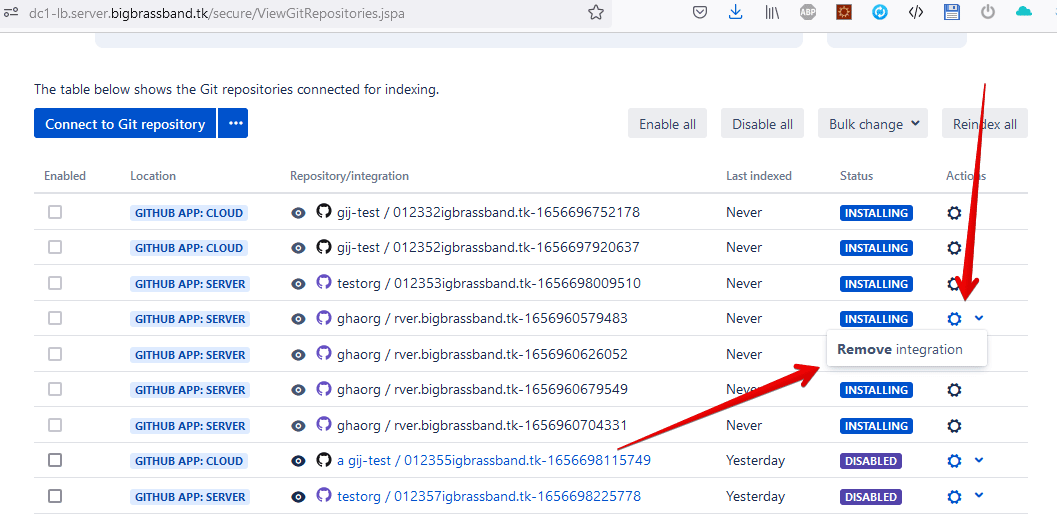
However, removing GHA integrations this way (in cases #1 and #2) will leave an unconnected/lost GHA on the GitHub server. As all data for connecting are stored in the integration, there is no way to connect an existing GHA to a new integration. On the other hand, the admin of the GitHub server can remove such lost GHA manually.
For case #3, while this case is very rare, the integration will remain in the Manage Git integration list. The Jira admin can remove the integration using the Remove integration action.
No displayed Pull Requests for GHA Enterprise integration on the Jira issue page
When creating a new connection to GitHub-app, Git Integration for Jira pp requests additional information about the Issues with at least a Read-only access level.
This issue refers on after adding or updating pull requests for a GitHub App Enterprise integration, the pull request information is not displayed in the Git integration panel on the Jira issue page.
This behavior affects GitHub Enterprise Edition (EE) versions ranging from (v2.22) to (v3.12). The GitHub.com version does not exhibit this issue. To address this, just assign read and write permissions for pull requests. For PAT scopes, include Pull requests:read as minimum requirement and add Pull requests:write to be able to create PRs from Jira Git integration panel.
For those who are experiencing problems with already existing applications and are still using older versions of GHE, follow these steps:
-
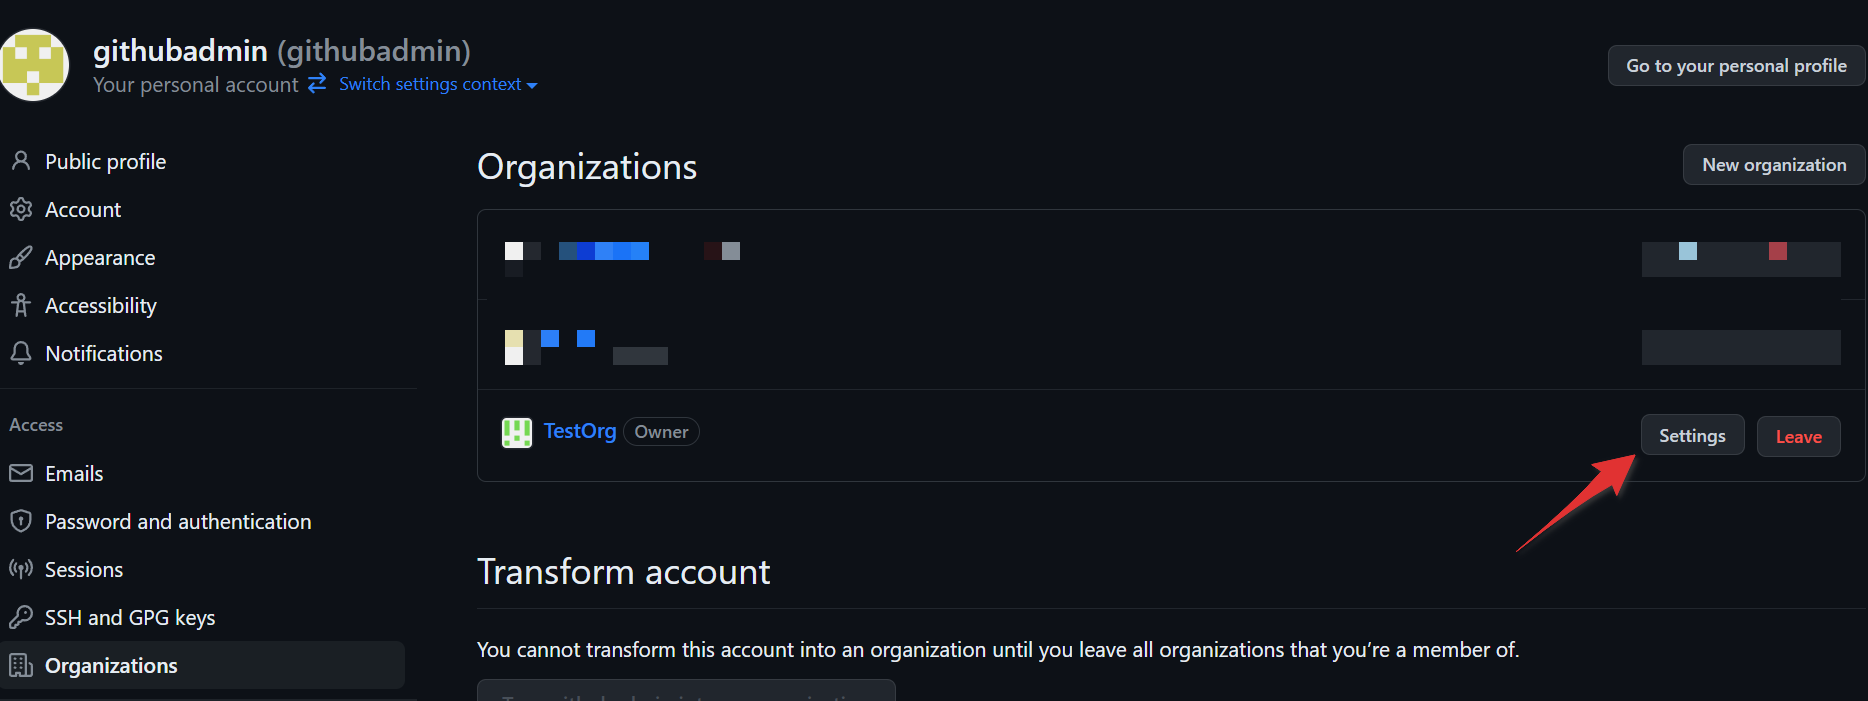
On your GHE portal dashboard, go to User profile ➜ Your organizations.
-
On the organizations list, select an org to manage by clicking on Settings.
-
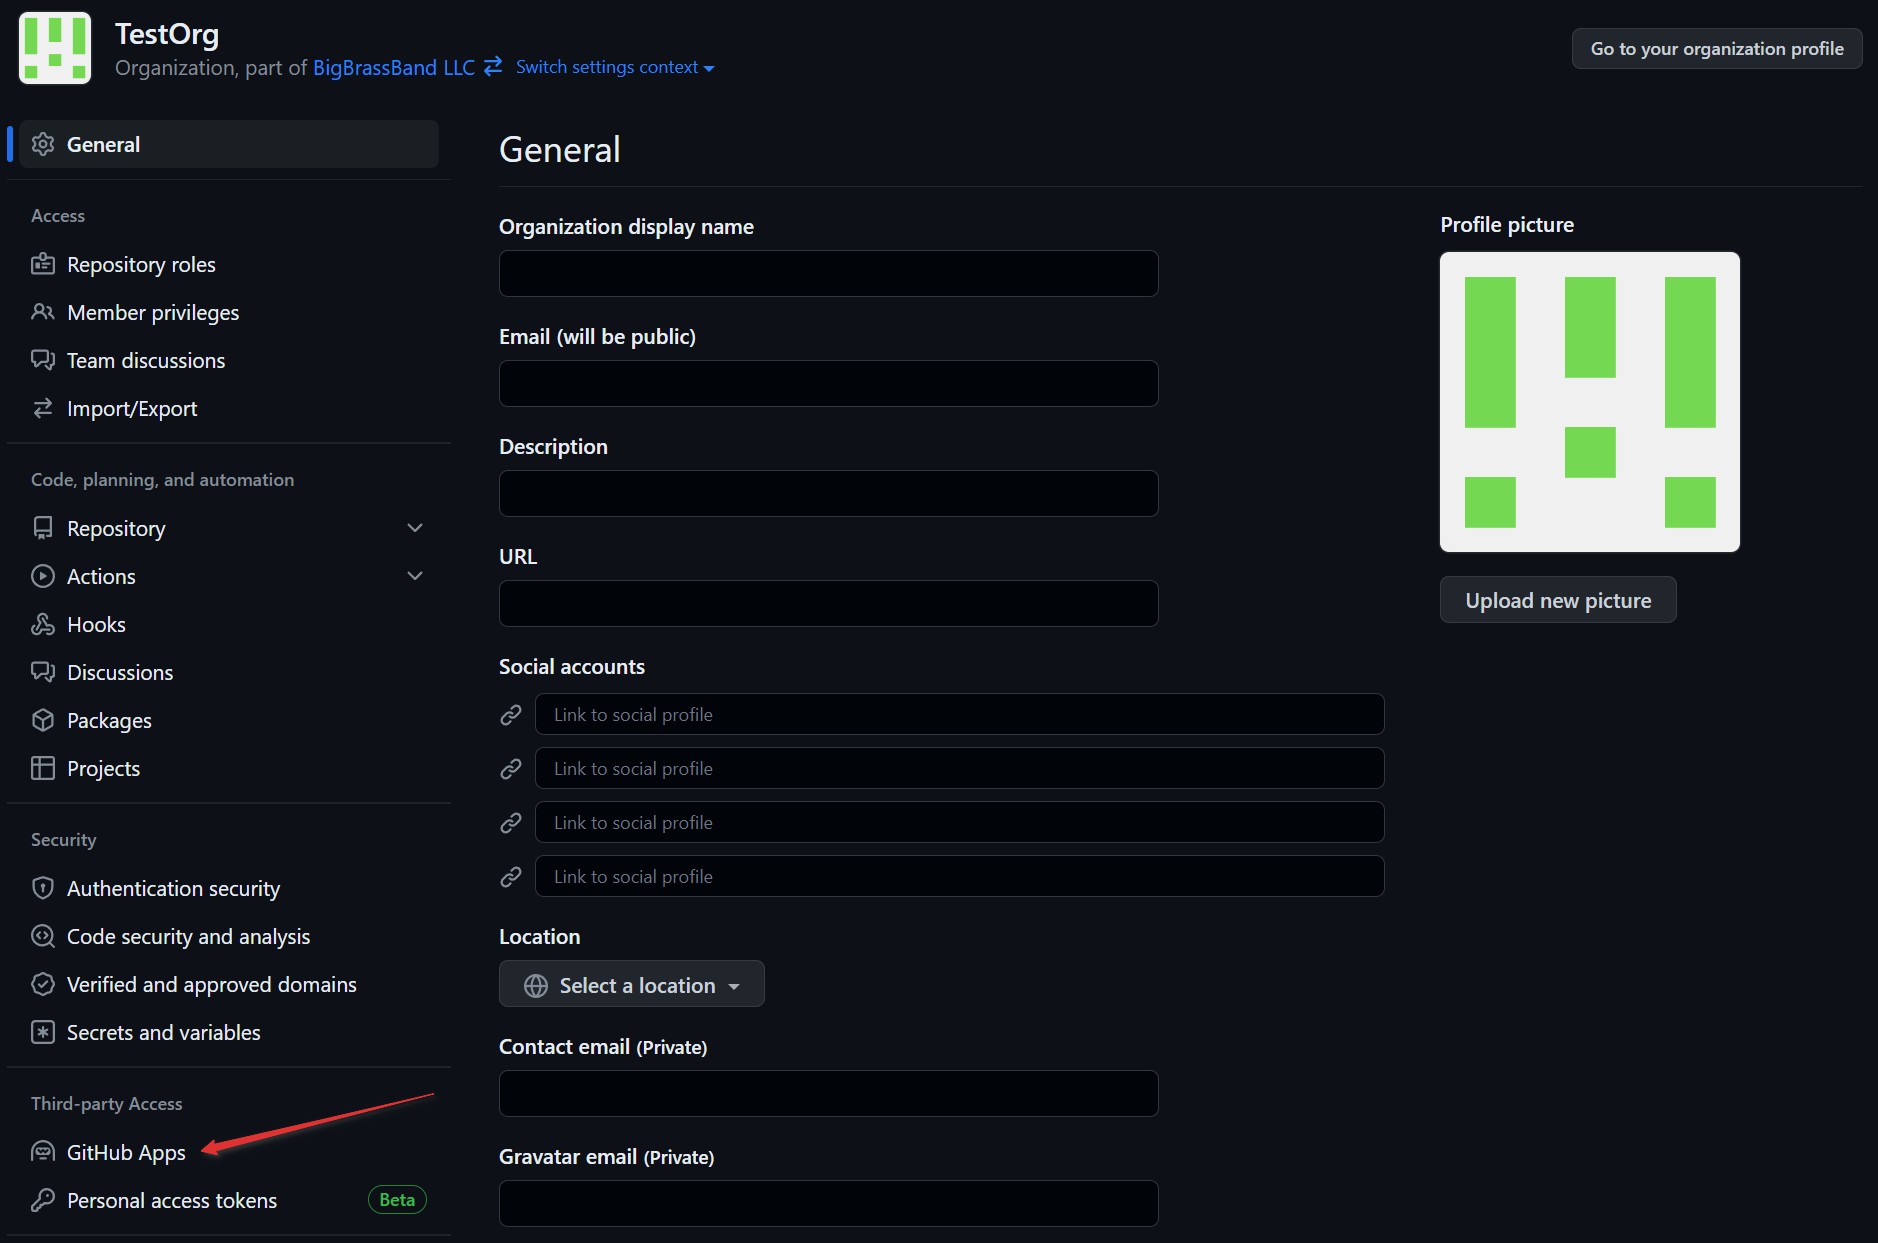
On the sidebar under Third-party Access, click on GitHub Apps.
-
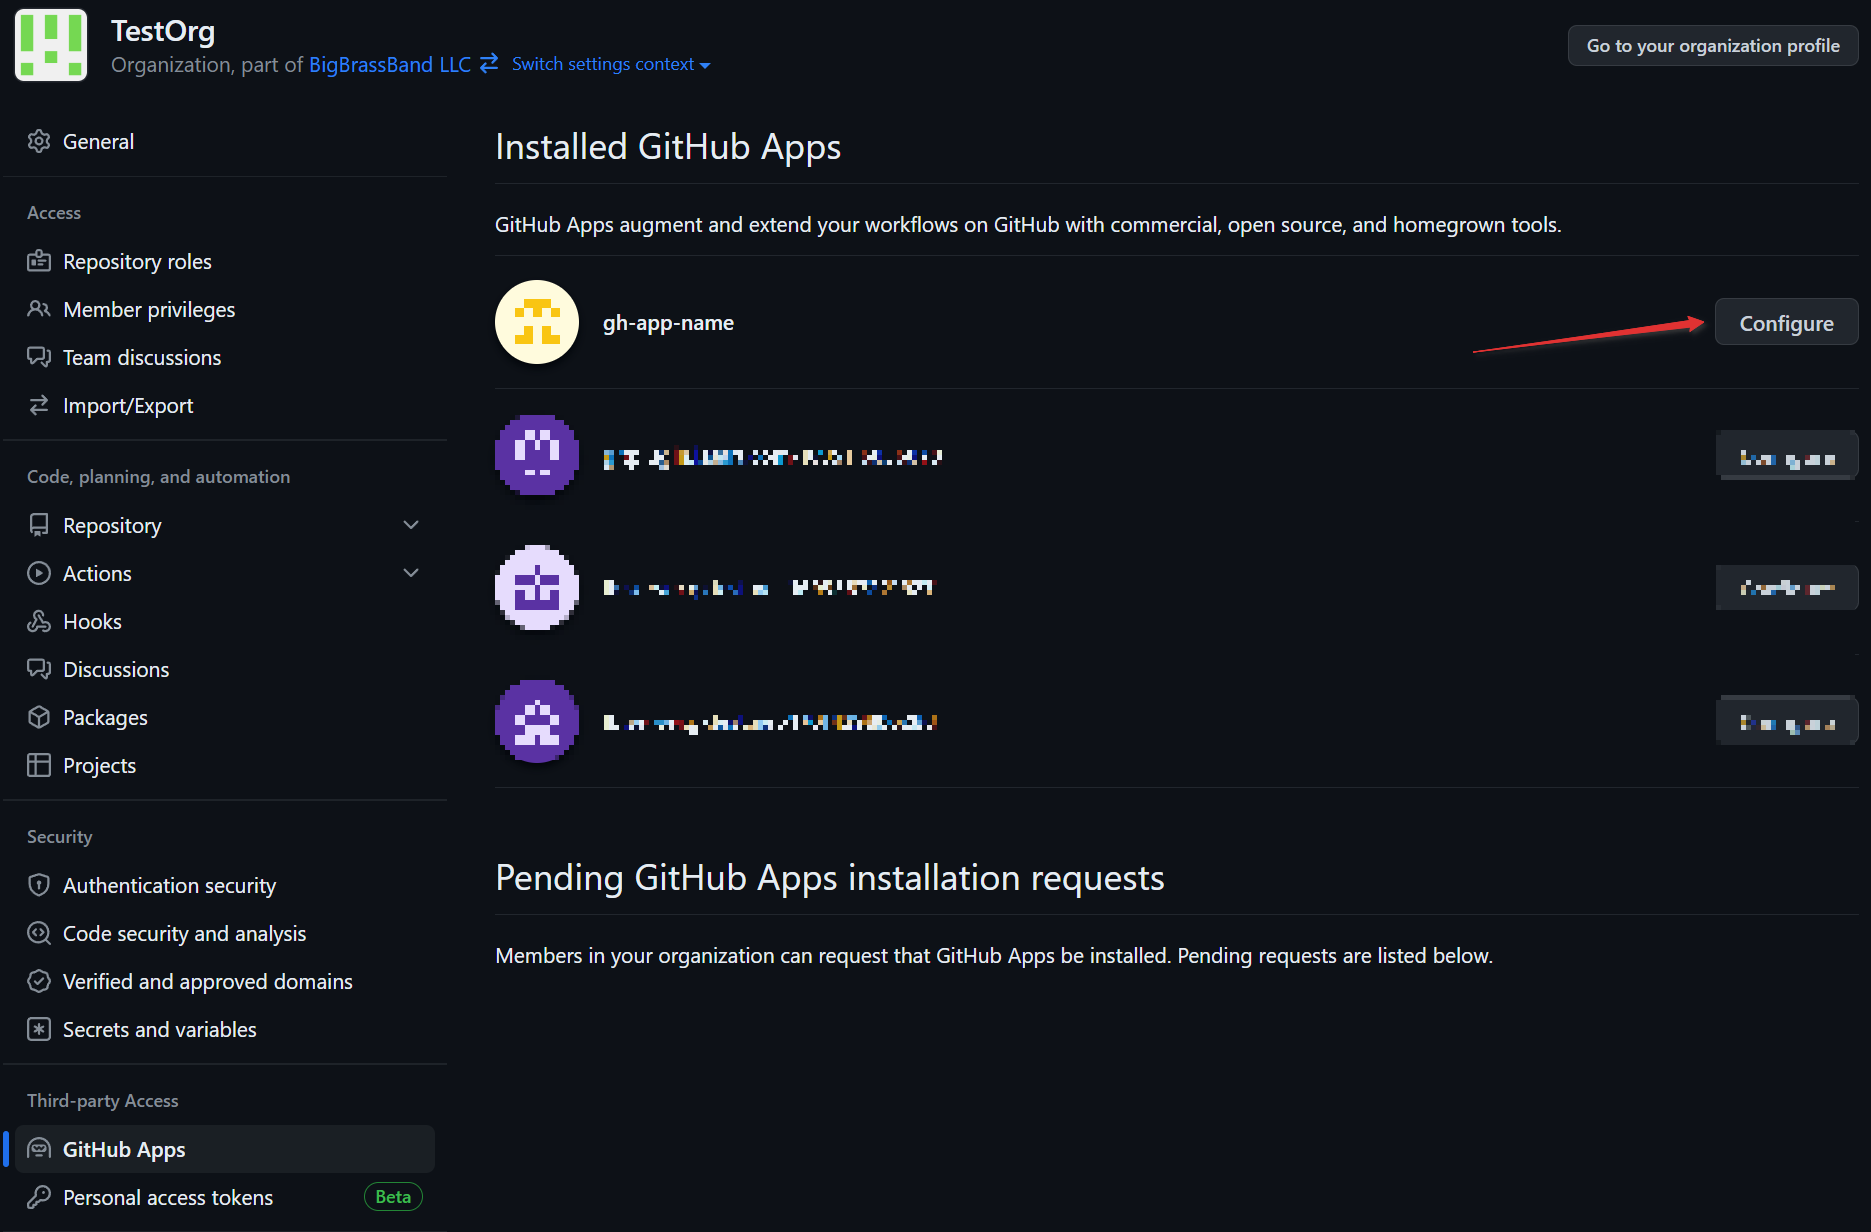
Under Installed GitHub Apps, click Configure for the selected GHA.
-
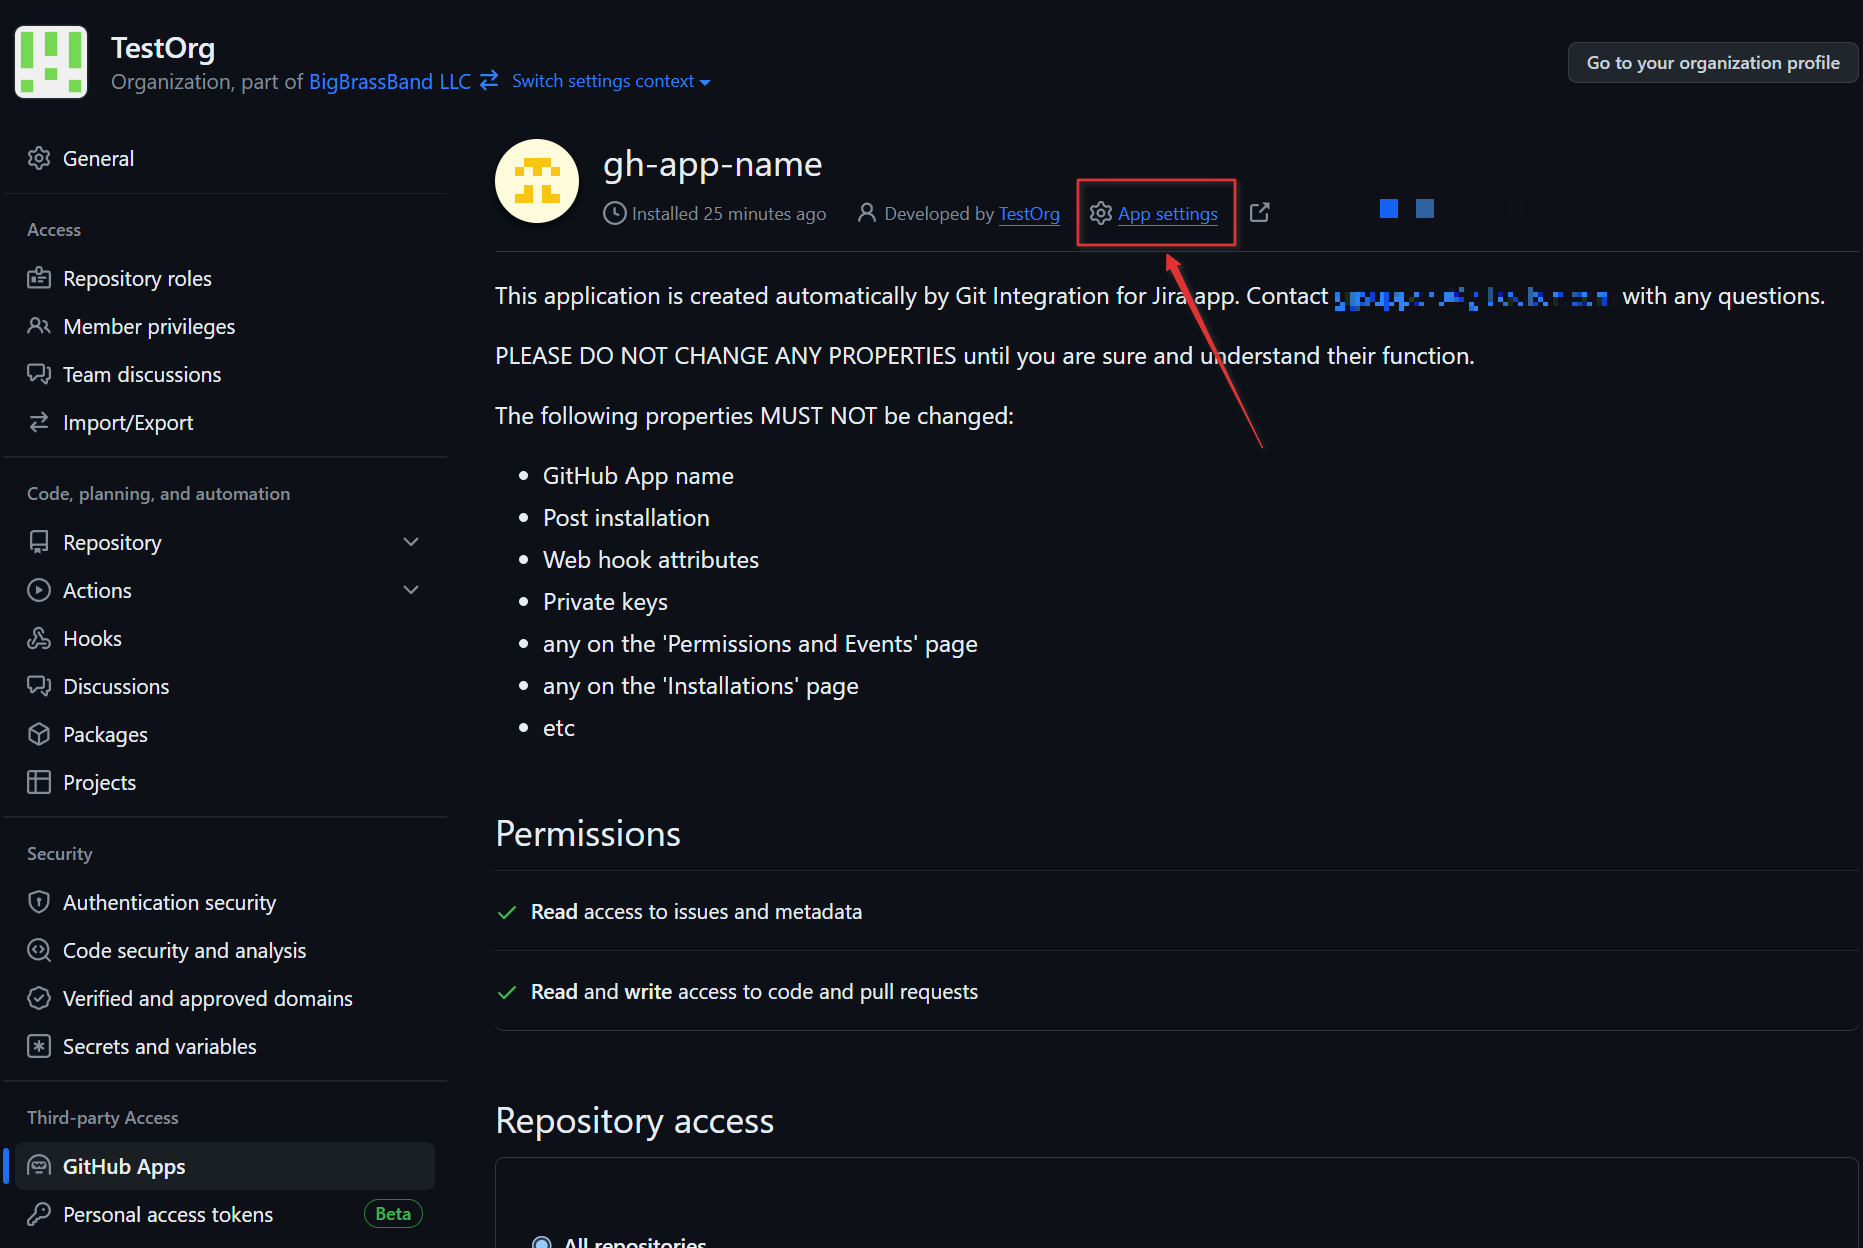
Click App settings for this GitHub App.
-
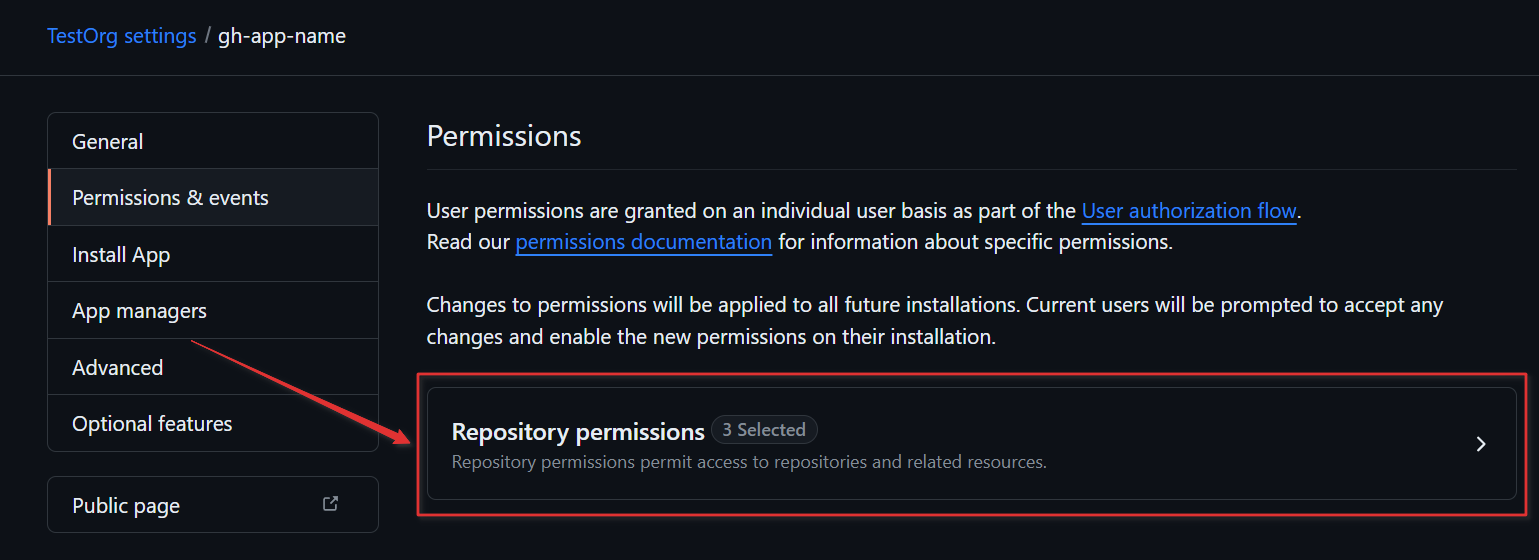
On the App settings page, click the Permissions & Events tab on the sidebar.
-
On the Permissions page, click on Repository permissions.
-
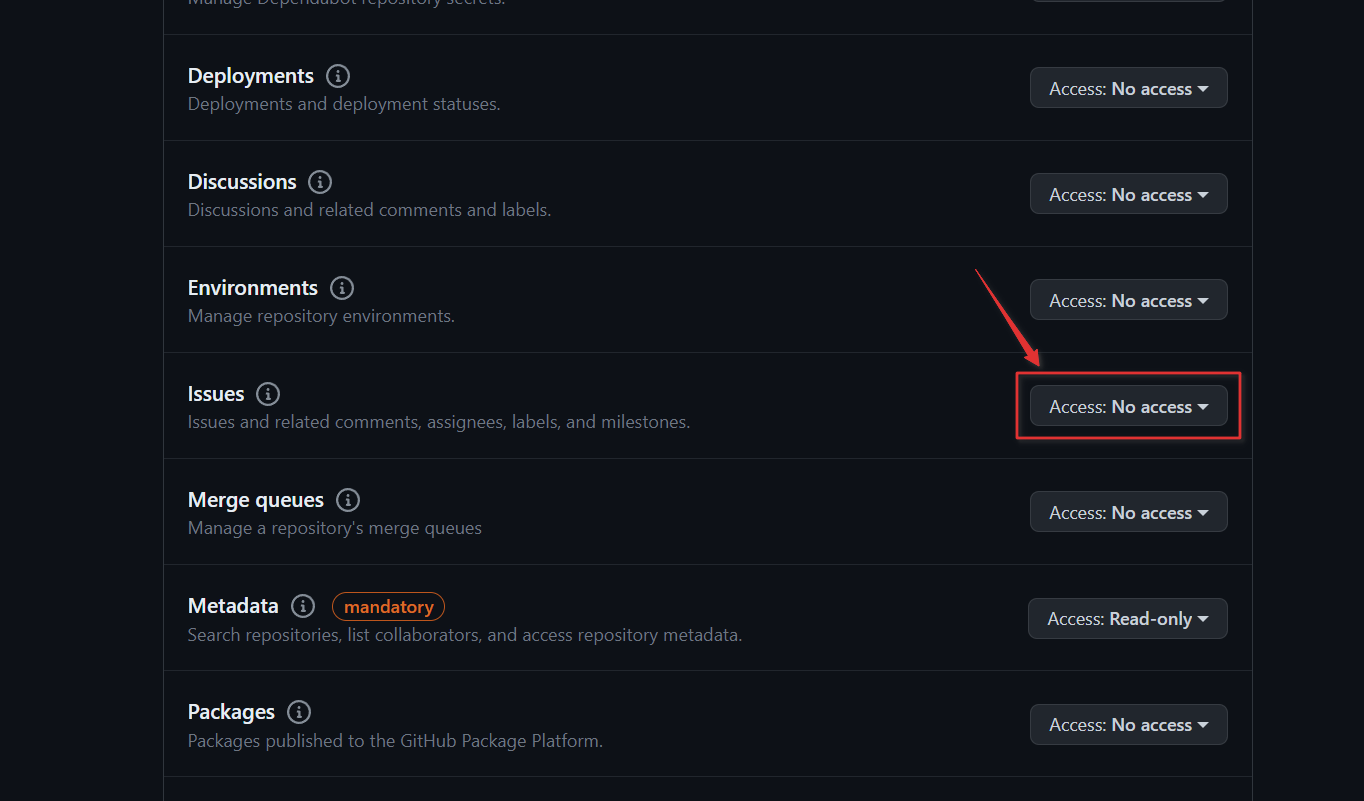
On the following page, scroll down to Issues then click on the Access dropdown.
-
On the access level dropdown list, click Read-only.

-
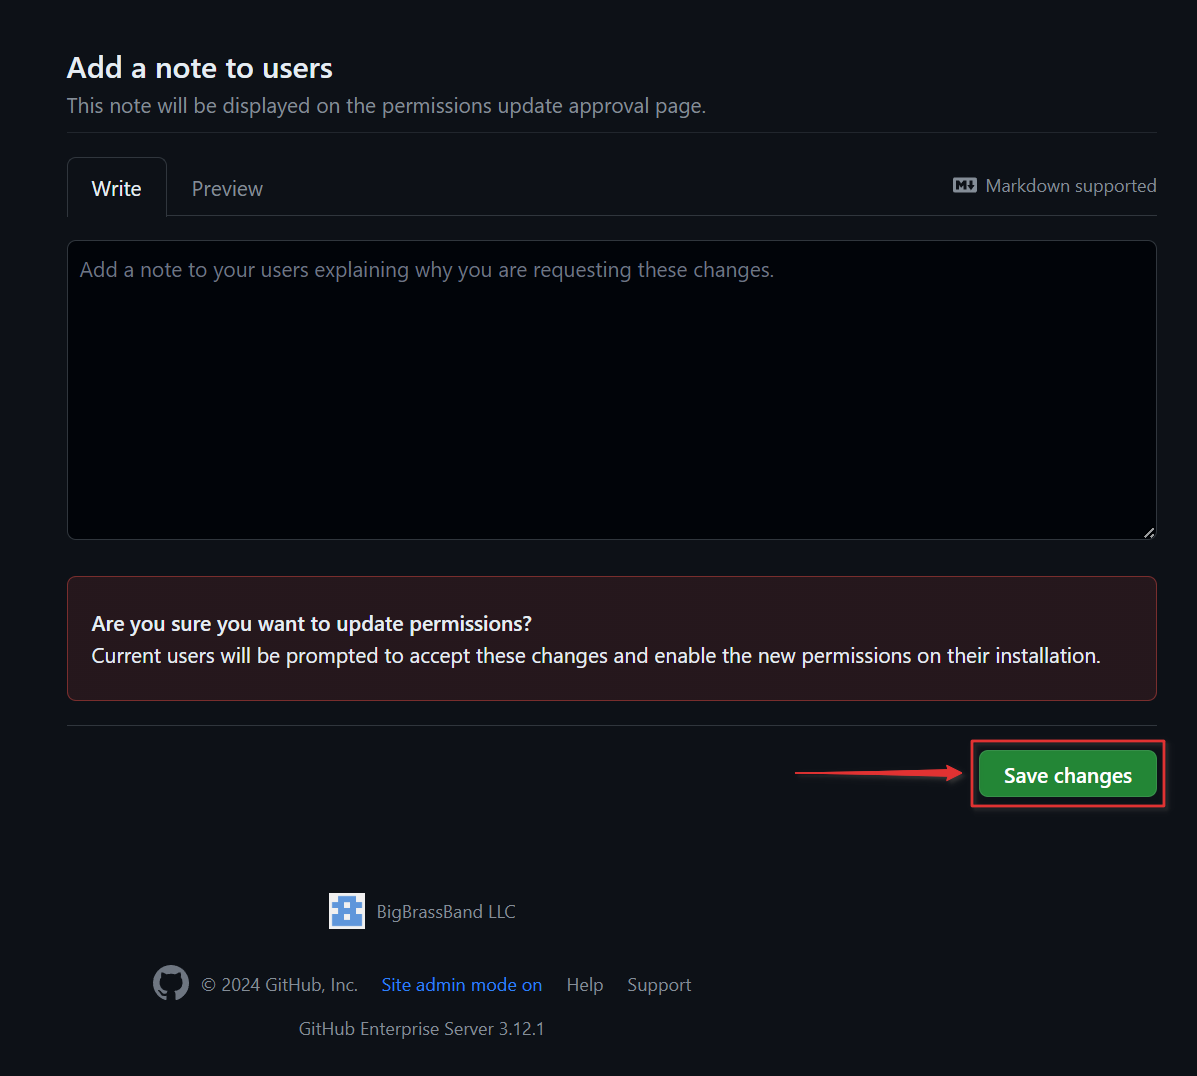
Click Save changes to apply the setting.
-
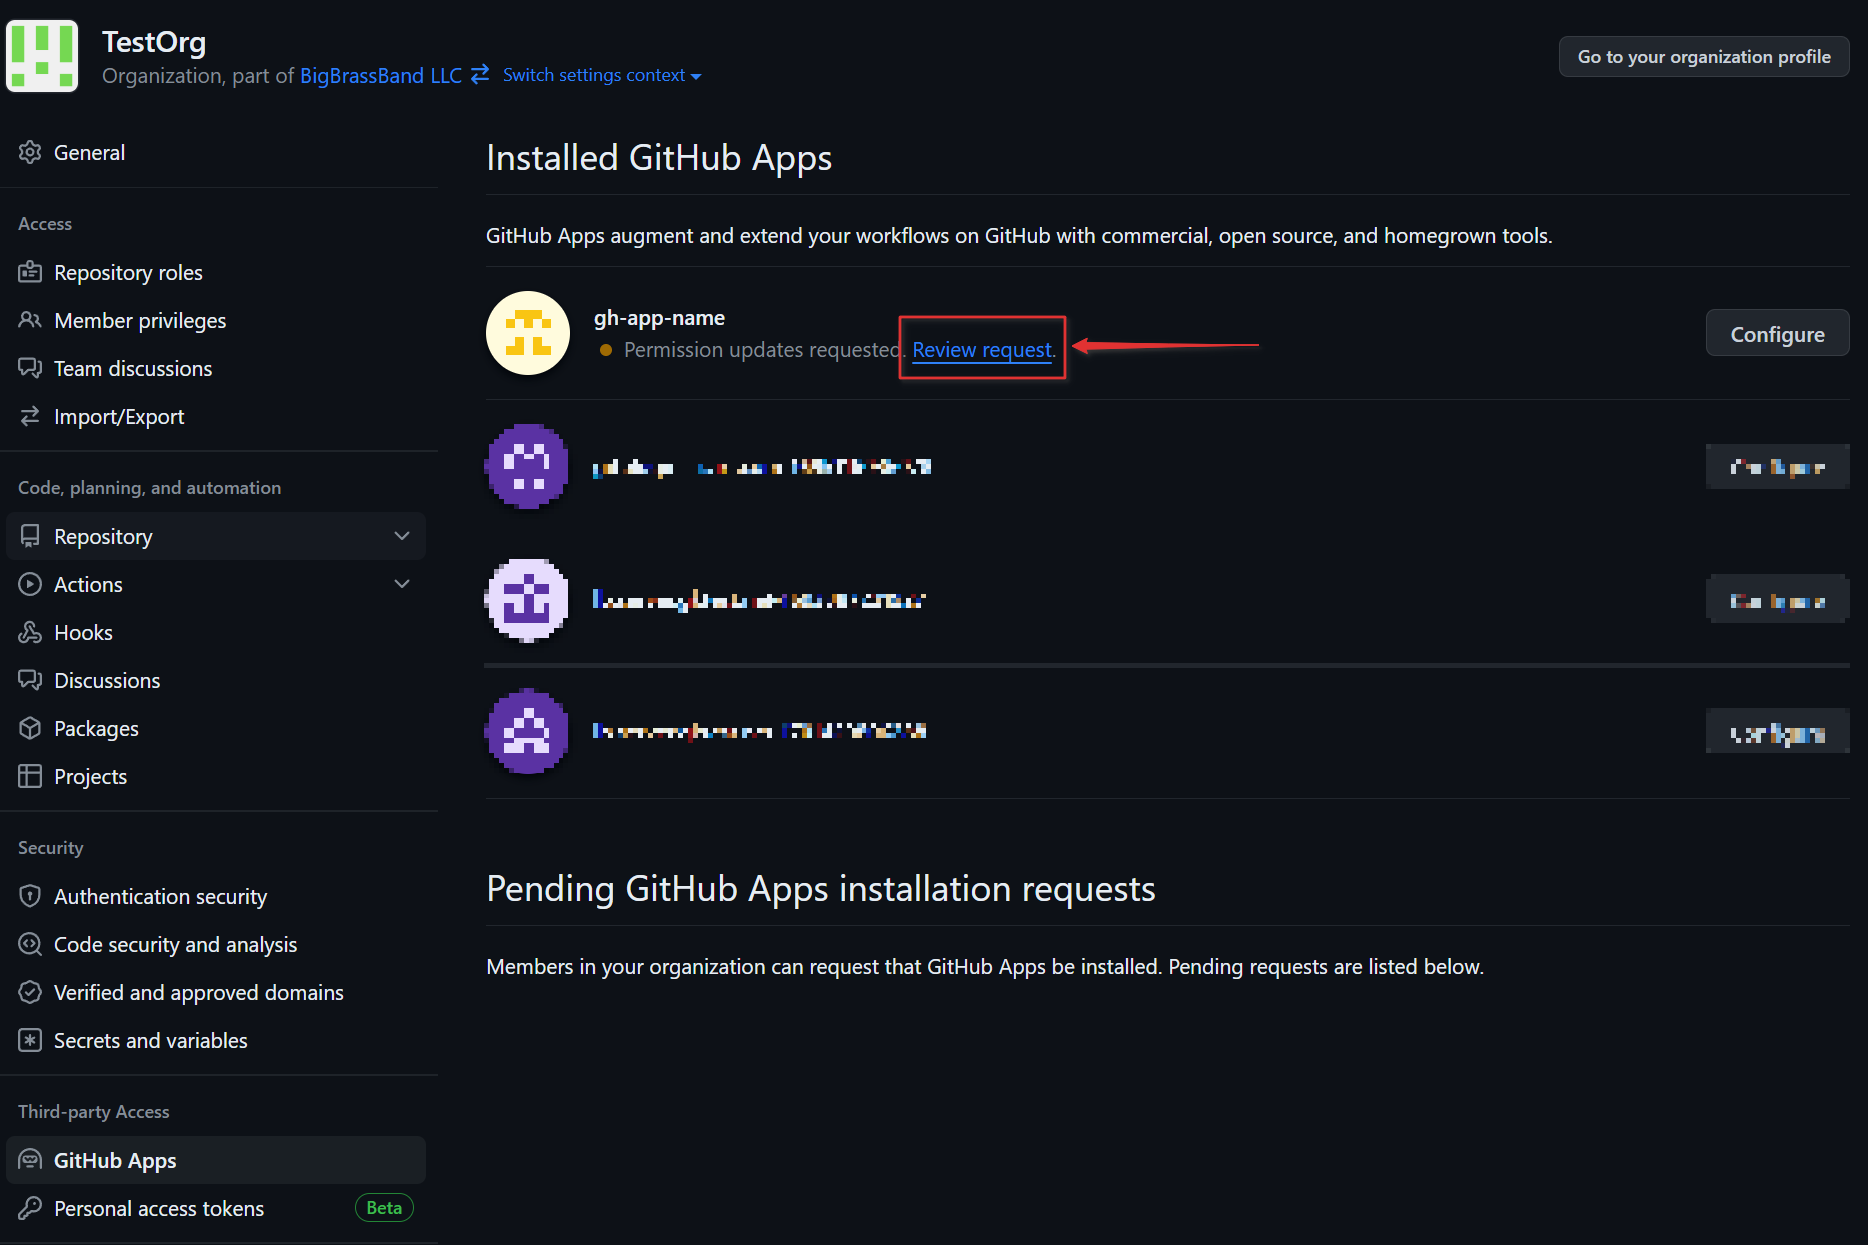
If there’s an incoming authorization request, refresh the Installed GitHub Apps page, then click Review request for the GitHub App that has pending permission request.
-
On the GHA requesting page, click Accept new permissions.
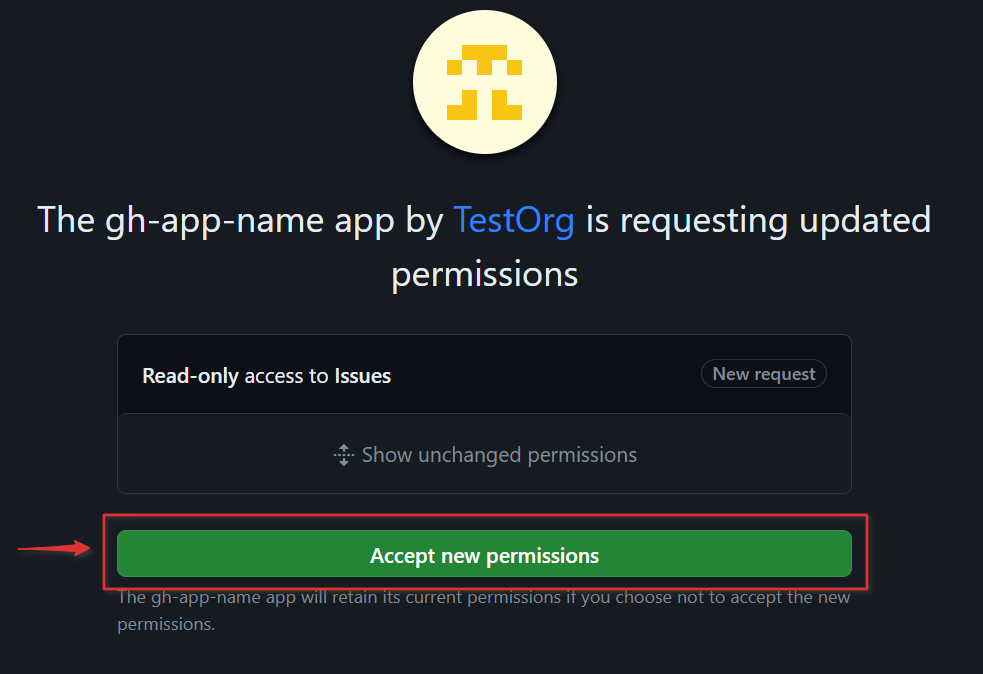
This should move the installation progress on the Manage integrations page of the Git Integration for Jira app.
More Integration Guides
GitHub.com (Git Integration for Jira Data Center/Server)
GitHub Enterprise Server (Git Integration for Jira Data Center/Server)
GitHub App integration (this page)
GitLab.com (Git Integration for Jira Data Center/Server)
GitLab CE/EE (Git Integration for Jira Data Center/Server)
Azure DevOps | Visual Studio Team Services (VSTS) (Git Integration for Data Center/Jira Server)
Azure DevOps Server | Team Foundation Services (TFS) (Git Integration for Jira Data Center/Server)
AWS CodeCommit (Git Integration for Jira Data Center/Server)
Gerrit (Git Integration for Jira Data Center/Server)
Bitbucket Server (Git Integration for Jira Data Center/Server)
Bonobo (Git Integration for Jira Data Center/Server)
Windows Network | Server Share (Git Integration for Jira Data Center/Server)
Tracked Folders (Git Integration for Jira Data Center/Server)
Back to: Integration basics (Git Integration for Jira Data Center/Server)
More Git Integration for Jira app features
See the Features section to learn more about Git Integration for Jira app features.
