
Last updated: March 2026
Smart commits allow your team to perform actions on Jira issues from a single commit. Users can enter the issue key and the desired action such as time tracking or closing an issue.
On this page:
- Getting started
- Basic commands
- Advanced examples
- Workflow transitions
- Viewing workflows
- General settings
- Jira Cloud Smart Commits and Workflow Triggers
- Automatic Workflow Triggers
- Email notifications for Smart Commits
Getting Started
Smart commit processing is active by default and can be enabled/disabled via the following locations:
- Manage repositories page ➜
 Actions ➜ Edit repository ➜ Feature settings.
 - Manage repositories page ➜ click a repository to open its Feature Settings page.

Smart commits support all alphabet characters.
Smart commits are case-insensitive.
Smart Commits Configuration Checklist
-
The Jira DVCS Connector Plugin is not required.
Git Integration for Jira has the functions of the connector plugin plus more integration support and features. -
Your Jira email address and Git commit email address must match. IMPORTANT
The commit author’s email must match exactly with a user’s email in Jira. If they do not match, the application adds the commit as the app. -
Email address is not shared by other Jira users.
Verify that this email address is used by only one Jira user. -
Advanced: Verify that the workflow conditions and validators are able to process successfully.
Basic Syntax
The basic syntax for a Smart commit message is:

Basic Commands
Use the following smart commit commands in your commit messages.
#comment
This command works in both Jira Server and Cloud.
The #comment command adds a comment to a Jira issue.
Syntax:
ISSUE_KEY #comment [your comment text]
Examples:
GIT-264 #comment Resolved conflicts.
GIT-1720 #comment Plugin version change from 2.8.2 to 2.8.3. Build number change from 69 to 70.
The above examples add the specified comment text against the Jira issues.
#time
This command works in both Jira Server and Cloud.
The #time command records time tracking information against a Jira issue.
Syntax:
ISSUE_KEY #time [Some amount in Jira time syntax] [Your worklog comment text]
Examples:
GIT-264 #time 1w 6d 13h 52m Total work logged.
GIT-1720 #time 1h 20m Merged to master. Released to marketplace.
The above examples add the respective time and worklog comment text against the Jira issues.
#<transition-name>
This command works in both Jira Server and Cloud.
The #<transition-name> command moves the Jira issue to a particular workflow state.
Syntax:
ISSUE_KEY #<transition-name> [Your commit comment text]
Examples:
GIT-264 #code-review For review.
GIT-1720 #close Closing ticket. #comment Tasks completed.
The first example transitions the Jira issue to the specified workflow state and adds the comment message to the commit.
The second example transitions the Jira issue to the specified workflow state, adds the comment “Closing ticket” to the Comment tab, and adds the specified comment, “Task completed” to the mentioned Jira issue.
For more information on transitions and workflow names, see the Workflow Transitions section.
#assign
This command works in both Jira Server and Cloud.
The #assign command assigns the particular issue to the specified Jira user.
Syntax:
ISSUE_KEY #assign [Jira username or email of Jira user]
Examples:
GIT-1925 #assign johnsmith
GIT-1961 #assign [email protected]
#label
This command works in both Jira Server and Cloud.
The #label command adds a new label to a Jira issue. If more than one Jira issue is referenced, the labels are added to all mentioned Jira issues. Create multiple labels by putting spaces between words.
Syntax:
ISSUE_KEY(S) #label [label1] .. [labeln]
Examples:
GITCL-443 #label bucketbreakfix bucketenhancement
GITCL-443 GITCL-247 GITCL-214 #label [email protected] [email protected] requested-feature new-feature #comment Return email when implemented
Advanced Examples
A Single Action on a Single Issue
Example:
TEST-100 #time 2w 1d 4h 30m This is a time log comment
Records the specified worklog #time of 2 weeks, 1 day, 4 hours, and 30 minutes and adds worklog comment “This is a time log comment” to the issue TEST-100.
Multiple Actions on a Single Issue
Example:
TEST-100 #time 4h 30m Fix null pointers #comment Fixed code #resolve
Logs specified #time of 4 hours and 30 minutes and adds worklog comment “Fixed null pointers” to the issue TEST-100; adds the #comment “Fixed code” and resolves the issue.
A Single Action on Multiple Issues
Example:
TEST-100 TEST-101 TEST-102 #resolve
Resolves specified issues.
Multiple Actions on Multiple Issues
Example:
TEST-100 TEST-101 TEST-102 #resolve #time 2d 4h #comment Fixed code
Resolves specified issues; logs specified #time of 2 days and 4 hours and adds #comment “Fixed code” against the issues.
Multi-line commit messages with smart commits are supported.
Multi-line Commit Messages
The following examples show correct usage of the smart commit message:
TST-1 implemented feature 1
TST-1 #comment some comment
in Jira
on several lines
TST-1 #resolve
TST-2 #time 1h 30m
In this example, an issue key that is present on every line is a valid multi-line commit message.
TST-1 implemented feature 1
#comment some comment
in Jira on several lines
#resolve TST-2
#time 1h 30m
This is the equivalent smart commit message based from the above example.
TEST-3 Background color of settings should be lighter
TEST-3 #in-progress #time 1h
TEST-4 resolve TEST-2 #resolve
This example, containing several issue keys, is also a valid multi-line smart commit message.
Workflow Transitions
The simple Jira workflow does not contain explicit transition names. These workflows with no explicit transition names are becoming more popular as Atlassian suggests them to administrators upon project creation.
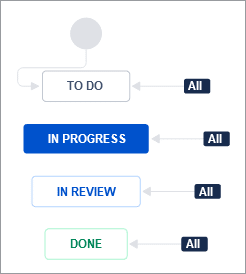
The name of the status is the transition. Using the basic example above, the valid transitions from DONE are:
- #to-do
- #in-progress
- #in-review
The workflow transition names must be unique.
When there are no transition names, use the status names. If there is a space, replace it with “–” (hyphens). For example, CODE REVIEW becomes
#code-review.
Only letters and “-” (dash) are valid for workflow transition names for smart commits. Any other characters are treated as invalid. Smart commits use only the valid characters before the occurrence of an invalid character for processing.
When adding transitions in the Workflow editor, make transition names simple and easy to remember. Use only letters and only one space between words.
Viewing Workflows
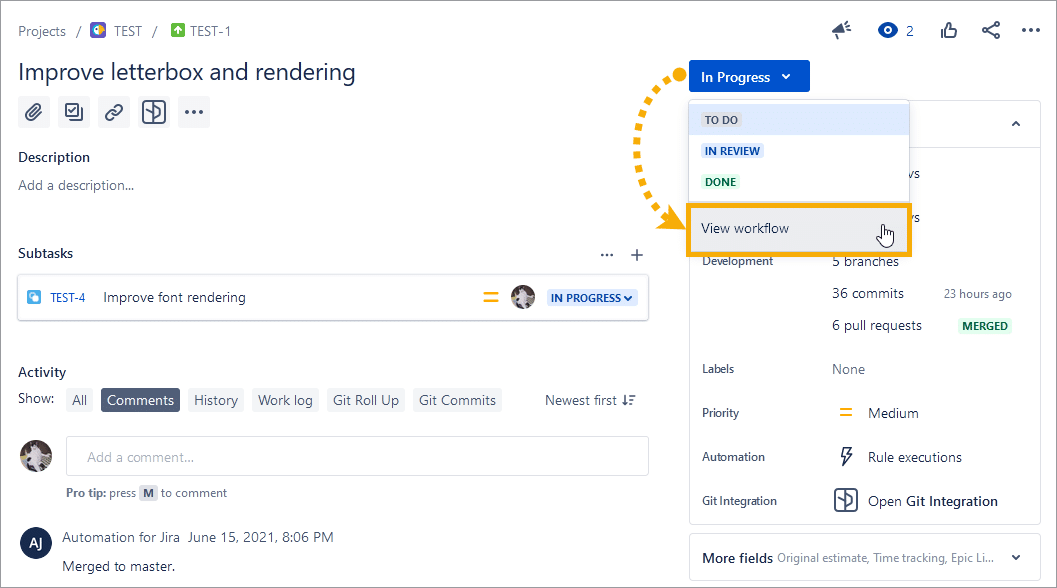
You can see the available custom workflow transition commands for use with smart commits by doing the following:
-
Open an issue and click View Workflow from the context of the issue’s status.
-
Hover a status.
When you hover a status, it highlights available transitions. This is the transition name used in smart commits, not the status name.
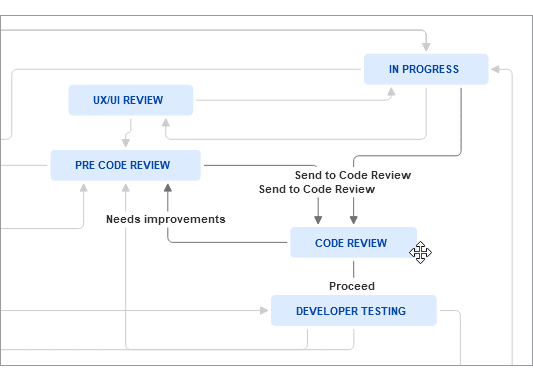
Below is an example using the above workflow where the issue is in IN PROGRESS status and you want to send it to CODE REVIEW status:
<ISSUE_KEY> #send-to-code-review or,
<ISSUE_KEY> #send-to-code and even,
<ISSUE_KEY> #send (yes, this works, as long as it does not conflict with another transition name)
Note that invalid characters can be used in the transition name. Jira accepts most of them and they can be used. However, smart commits only process letters and dash characters.
Thus, the part of the transition name up to the invalid character can be used for transitions; where spaces become “-“.
Transition Name Examples
| Transition name | Smart Commit transition |
|---|---|
SEND_TO_QA |
SEND |
SEND-TO_QA |
SEND-TO |
SEND TO_QA |
SEND-TO |
There must be at least one unique way to call each transition name. If you have multiple transition names from a single status that use the same word, the smart commits fail.
Example: An issue status NEW has these two transition paths:
SEND_TO_DEVELOPMENTSEND_TO_BACKLOG
The invalid characters are used before unique transition names are possible. Both become “#SEND“. Therefore, they are not unique and these transitions fail.
Better example: The transition names have spaces instead:
SEND TO DEVELOPMENTSEND TO BACKLOG
Both of these transitions are smart commit-friendly and the possible transitions are:
- #SEND-TO-D…
- #SEND-TO-B…
The “…” indicates the truncation with the least character length to have the transition names be recognized as unique by Smart Commits.
General Settings

JIRA CLOUD DEV INFO
Max commit age – This setting is a hidden feature in Git Integration for Jira Cloud and Dev Info for Jira Cloud. All commits older than this setting (in seconds) are ignored for smart commits processing. The default value is 1209600 seconds (14 days).
Jira Cloud Smart Commits and Workflow Triggers
Both Send Development Information to Jira Cloud and Enable Dev Info Smart Commits & Workflow settings must be enabled for automatic workflow triggers to be enabled.
General Settings Effect on Smart Commits Commands
Note that the following settings affect availability of specific smart commit commands as outlined below:
| When this General setting is enabled | #time | #label |
|---|---|---|
| Jira Cloud Smart Commits |  |
 |
| Git Integration app Smart Commits | |
|
| Both Jira Cloud Smart and GIJ app Smart commits | (doubled #time and #comment) |
|
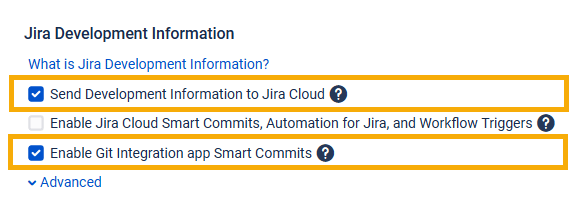
How to Enable or Disable Jira Cloud Smart Commits, Automation for Jira and Workflow Triggers
-
Install the Git Integration for Jira or the Dev Info for Jira app.
-
Navigate to the General settings page of the application (Jira Settings ➜ Apps ➜ (sidebar) General settings).
-
Select the Send Development Information to Jira Cloud checkbox to enable it. This also allows access to the Enable Jira Cloud Smart Commits, Automation for Jira and Workflow Triggers setting.
-
Select the Enable Jira Cloud Smart Commits, Automation for Jira and Workflow Triggers checkbox to enable this setting.
-
Click Update to save the settings.
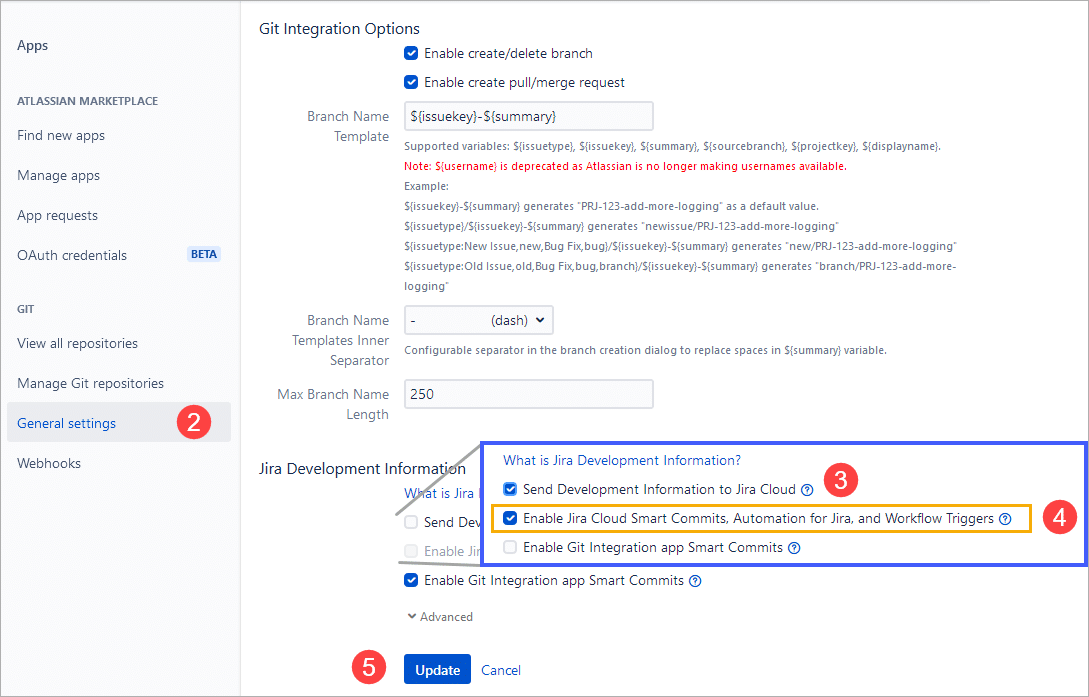
This setting engages the native Jira Cloud Smart Commit processing (only #time, #comment, and #transitions) as well as enables Automatic Workflow Triggers.
For more information, see Atlassian’s Smart Commits or Automatic Workflow Triggers documentation.
Automatic Workflow Triggers
Use your development activity to make automatic changes in your Jira project workflows. For example:
-
You can configure your Jira workflow to automatically send a Jira issue to IN REVIEW status when a pull request is pushed and associated with the issue.
-
You can send a Jira issue to IN PROGRESS when a commit is pushed and associated with a Jira issue.
- Commit created
- Branch created
- Pull request created
- Pull request merged
- Pull request declined (closed)
- Pull request reopened
Configuring Automatic Workflow Triggers
To configure automatic workflow triggers for your project:
-
Go to
Project settings. -
Select Workflow on the sidebar.
-
Click
 Edit on the Actions column.
 -
Click Text to display the Diagram in text mode.
-
Under Transitions column, click a transition item.
-
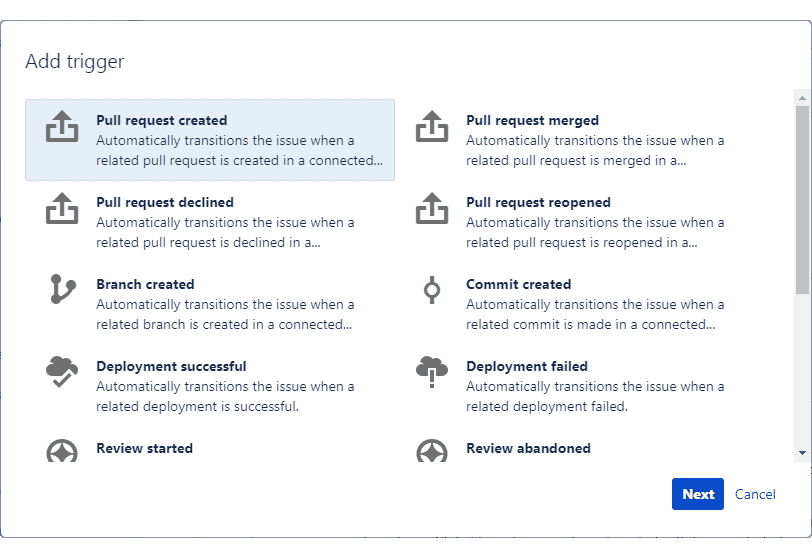
Click Add trigger. The Add trigger dialog appears.
-
Click Commit created.
-
Click Add trigger. This trigger automatically transitions the issue when a related commit is made in a connected repository.
-
Click Publish Draft. This action publishes the currently edited workflow. Create a backup or set it to No then click Publish.
The automatic workflow trigger is now configured.
Demo Video: Configuring Automatic Workflow Trigger
Email Notifications for Smart Commits
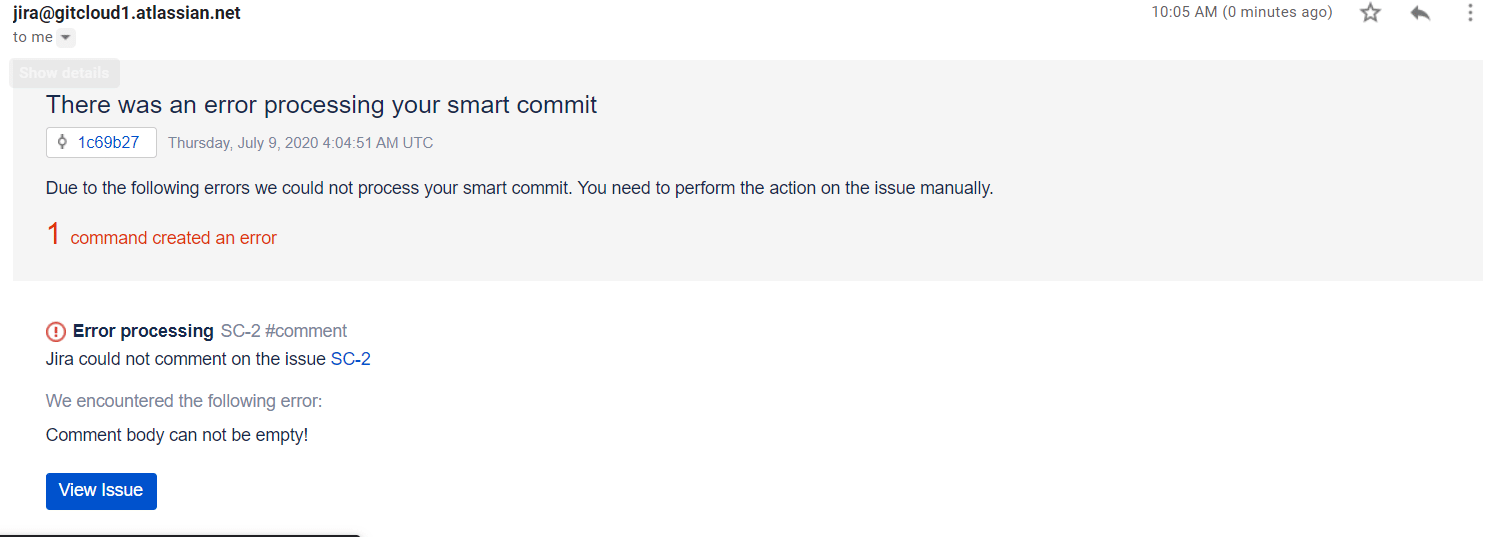
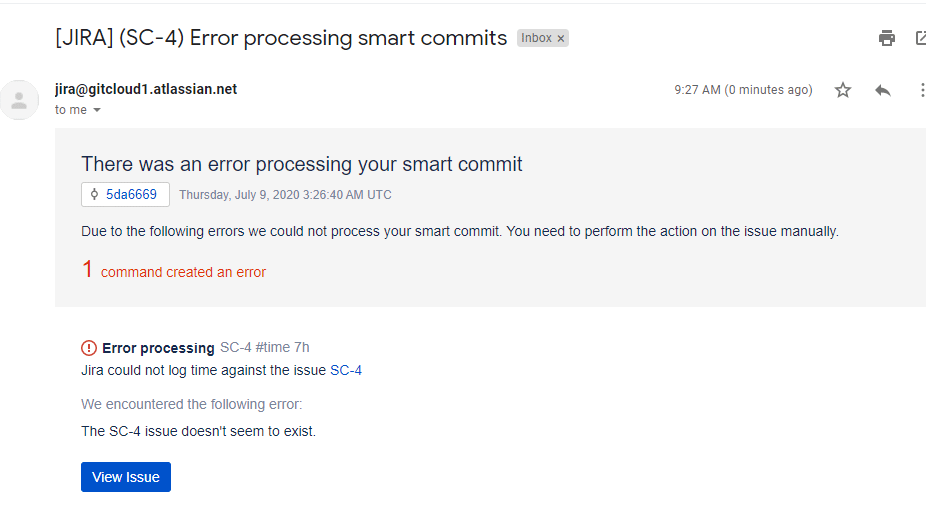
Sometimes users make mistakes in constructing smart commits syntax or try to use the name of the transition which is not available for the current issue status. In these cases, users receive smart commit errors via email notifications.
Prerequisite
Users must have a matched email address for Jira and the integrated git host.
Examples of Smart Commits Messages that Fail
1. Smart commits without any value after the command
For example, JIRA-1 #time or TES-1 #comment

2. Smart commits with an invalid issue-key
For example, JIRA-700000 #time 4h 30m
3. Smart commits with a non-editable workflow state

Examples of Smart Commits Messages that are Processed Correctly
1. Smart commits with a command and a value for it
Example: JIRA-1 #time 1w 2d 4h 30m
The above example adds the time of 1 week, 2 days, 4 hours, and 30 minutes (220.5 hours) to the Jira issue.
2. Smart commits with a correct transition name
Example: JIRA-1 #close
The above example moves the stage of the Jira issue to CLOSED.
Prev: Linking git commits to Jira issues
