
Last updated: March 2026
The Git Integration for Jira app adds two features to the Jira issue developer panel – Create branch and Create pull/merge request. For more information on where to access them, see the Jira Git integration development panel documentation.
Default branch
Most git integrations allow changing the default branch of the repository/project to something other than “master”. This change reflects in the Repository Settings of the Git Integration for Jira app on the next reindex. Full feature integrations support this feature where Git Integration for Jira app retrieves the default branch from almost all integrations and applies this setting at the repository level. For Gerrit, the default main branch is always “master”.
You can only change the main branch for repositories within an integration on the git server.
Create branch
- Jira users can provide their own personal access tokens (PAT) even if the Jira admin does not require them. See Require Personal Access Tokens for user actions (create branch/pull request) for configuration instructions.
- The View developer tools permission is required to view the Source Code panel (see more in Issue Git Source Code Panel). Jira users must also have the Browse Project permissions to a project associated with a repository to view.
- You can disable the create branch feature for all Jira users (regardless of permissions) in General settings.
The Create branch feature allows Jira users to create a git branch directly from the Jira issue.
Advantages of creating branches from Jira
When you create a branch from within Jira:
-
The branch name automatically includes the issue key (necessary for branch ↔ issue association) and issue summary.
-
You can customize default branch naming conventions to match your development workflow. For example:
${issuetype:New Issue,new,Bug Fix,bug}/${issuekey}-${summary}generates “bug/PRJ-123-add-more-logging” (See General settings for more information). -
You can require each Jira user to provide their Personal Access Token for creating branches. This option adds friction to creating branches/pull requests but enforces git server user permissions and provides better attribution for actions. See Require Personal Access Tokens for user actions (create branch/pull request) for more information.
-
Each Jira user can set a Default repository for the current Jira project. (See User settings for more information).
Supported platforms for Create branch
-
Full feature integrations:
- GitHub
- GitLab
- Bitbucket Cloud
- AWS CodeCommit
- Azure DevOps
- Microsoft Visual Studio Team Services (VSTS)
- Microsoft Team Foundation Server (TFS)
-
Supported in the Atlassian Jira Cloud iOS, Android, and MacOS apps.
-
Company-managed and Team-managed Jira projects supported.
-
New and old Jira Issue View supported.
Steps to creating a git branch in Jira
-
PREREQUISITE A Jira administrator configures a Full feature integration in the Git Integration for Jira Cloud app. See the Integration Guide for more information.
-
To access the Create branch action, do one of the following:
- Enable the Git Development panel, or
- Open the Issue Git Source Code Panel
-
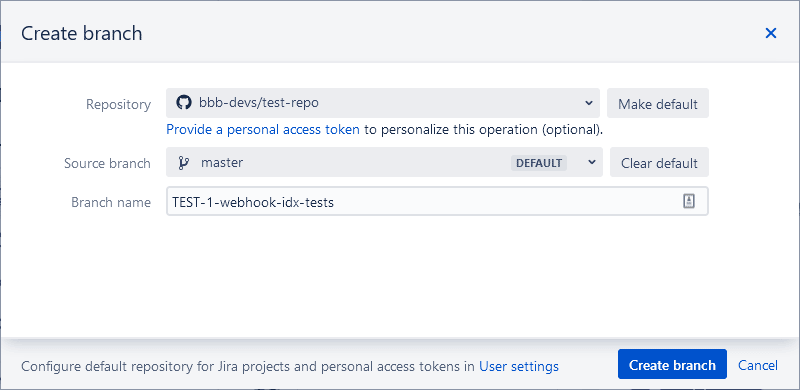
Click Create branch in one of the panels from step 2.
-
Select a git repository.
- Optional: Designate the repository as the default selected repository for the current Jira project. To configure default repositories for more than one Jira project, use the User settings page.
- Use the search box to find the specific repository.
-
If a personal access token is required (and not yet provided), follow the on-screen instructions to provide a personal access token with the correct permissions for the selected repository.
-
Select a base branch.
-
Verify the branch name is correct. Edit as desired. Note: The Jira issue key must remain in the branch name to create the branch ↔ Jira issue association.
-
Click Create branch.
Make a commit to this branch, then continue to create a pull/merge request.
Create pull or merge request
- Jira users can provide their own personal access tokens (PAT) even if the Jira admin does not require them. See Require Personal Access Tokens for user actions (create branch/pull request) for configuration instructions.
- The View developer tools permission is required to view the Source Code panel (see more in Issue Git Source Code Panel). Jira users must also have the Browse Project permissions to a project associated with a repository to view.
- You can disable the create pull request feature for all Jira users (regardless of permissions) in General settings.
GitLab uses the term Merge Request rather than Pull Request (used by other major git services). In this article, Pull Request and Merge Request are interchangeable.
The Create pull request feature allows Jira users to create a git pull request directly from the Jira issue.

Advantages of creating pull requests from Jira
When you create a pull request from within Jira:
-
The pull request title automatically includes the issue key (necessary for pull request ↔ issue association) and issue summary.
-
You can require each Jira user to provide their Personal Access Token for creating pull requests. This option adds friction to creating pull requests/branches but enforces git server user permissions and provides better attribution for actions. See Require Personal Access Tokens for user actions (create branch/pull request) for more information.
-
Each Jira user can set a Default repository for the current Jira project. (See User settings for more information).
Supported platforms for Create pull request
-
Full feature integrations:
- GitHub
- GitLab
- Bitbucket Cloud
- AWS CodeCommit
- Azure DevOps
- Microsoft Visual Studio Team Services (VSTS)
- Microsoft Team Foundation Server (TFS)
-
Supported in the Atlassian Jira Cloud iOS, Android, and MacOS apps.
-
Company-managed and Team-managed Jira projects supported.
-
New and old Jira Issue View supported.
Steps to creating a git pull request in Jira
-
PREREQUISITE A Jira administrator configures a Full feature integration in the Git Integration for Jira Cloud app. See the Integration Guide for more information.
Important
The source branch for the pull/merge request must have a commit. You must fulfill this condition to create a pull/merge request via the Jira Git Integration panel. -
To access the Create pull/merge request action, do one of the following:
- Enable the Git Development panel, or
- Open the Issue Git Source Code Panel
-
Click Create pull request in one of the panels from step 2.
-
Select a git repository.
- Optional: Designate the repository as the default selected repository for the current Jira project. To configure default repositories for more than one Jira project, use the User settings page.
- Use the search box to find the specific repository.
-
If a personal access token is required (and not yet provided), follow the on-screen instructions to provide a personal access token with the correct permissions for the selected repository.
-
Select a source branch.
-
Select a target branch.
-
Verify the pull request title is correct. Edit as desired. Note: The Jira issue key must remain in the pull request name to create the pull request ↔ Jira issue association.
-
Click Create pull request.
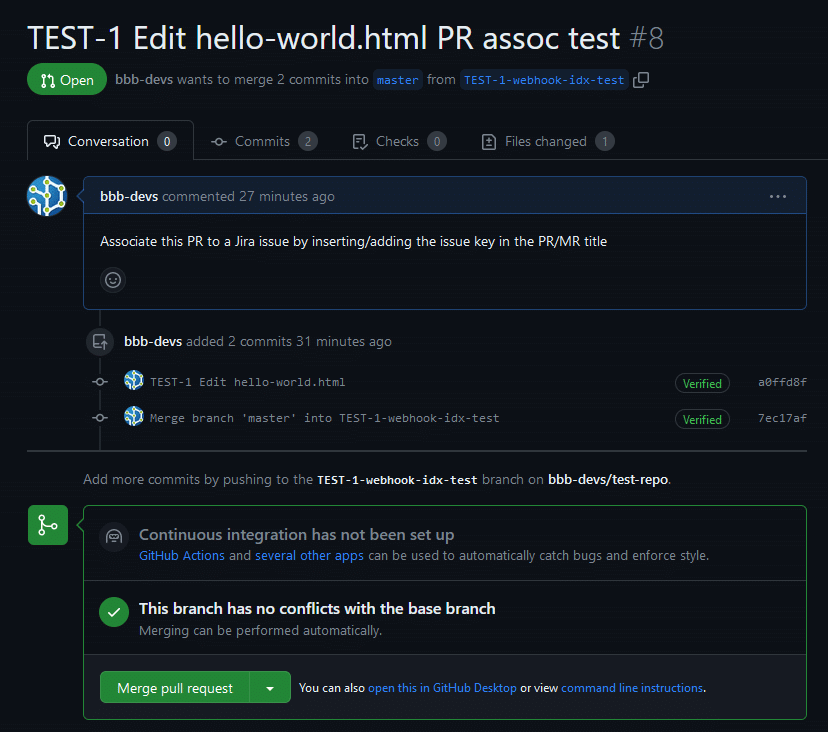
Associating pull/merge request to Jira issue
A git service user can create a PR/MR via the Git host service portal by adding a Jira issue key in the PR/MR title. The system automatically adds this to the Pull/Merge request list in the Jira issue Git developer panel.
| Git service portal |
|---|
 |
| Jira issue PR/MR list view |
|---|
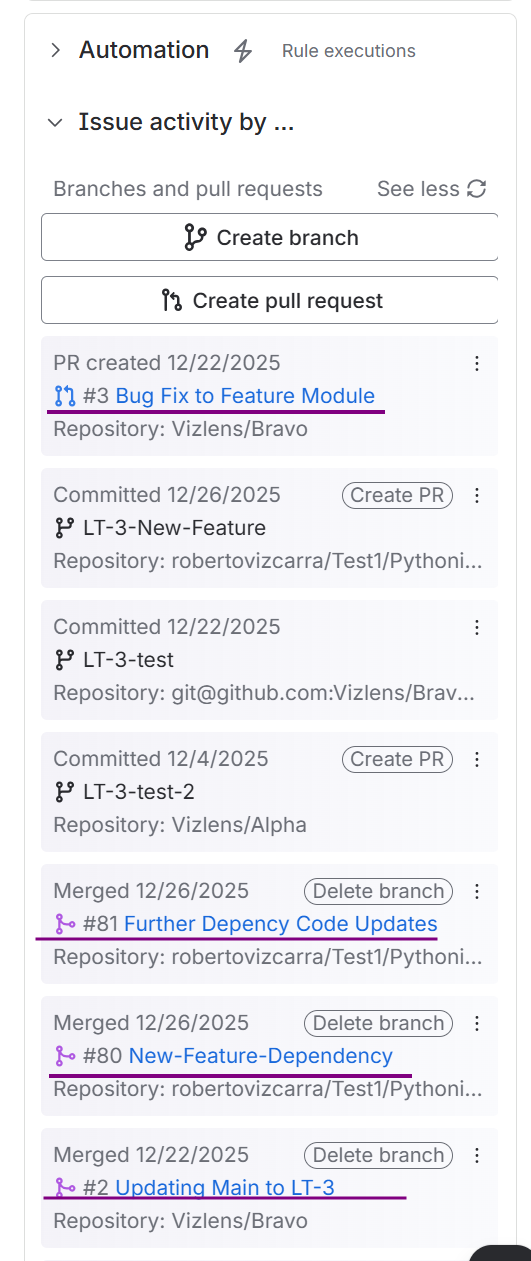 |
Additionally, creating a PR/MR via the Git developer panel automatically associates the PR/MR with the Jira issue.
