
Integrate GitHub.com with Jira Data Center/Server
Quickly learn how to connect GitHub.com git repositories via Git Integration for Jira Data Center app.
What’s on this page:
- Integrate GitHub.com with Jira Data Center/Server
- Creating a personal access token
- Setting up GitHub permissions
- Default repository permission
- Teams and collaborators
- Using Full feature integration
- Single repository (Manual integration)
- Setting up GitHub web links
- Viewing git commits in Jira Data Center
- Require User PAT settings for user access
- Working with branches and pull requests
- Default branch
- Creating branches
- Creating pull requests
- How to enable GetRepositories log response from GitHub to the Jira log?
- More Integration Guides
new browser tab for more viewing options.
Creating a personal access token
While instructions from GitHub works just fine, follow this article for some specific instructions to get you started.
VERSION 4.27+
There will be two new options now available in the GIJ General Settings. Enabling these settings requires an “extended” scope for your PATs.

To utilize the new GitHub share PR events, we recommend that users must update their personal access token to have the following scopes:
read:discussionread:orgread:userrepo(all)user:email
Setting up GitHub permissions
We recommend using a “service user” in GitHub (example: Git-Integration-for-Jira) to be used to integrate GitHub with the Git Integration for Jira app. This dedicated “service user” will allow the GitHub administrator to set permissions so the app clones only the desired repositories.
Assign GitHub permissions for team members or collaborators to allow which resources are accessible for service users. This feature is only available in a GitHub Organization.
Default repository permission
-
Login to your GitHub.com account.
-
Go to
 Profile ➜ Settings.
 -
On your sidebar, click Organizations.
-
Click Settings for the selected organization.
-
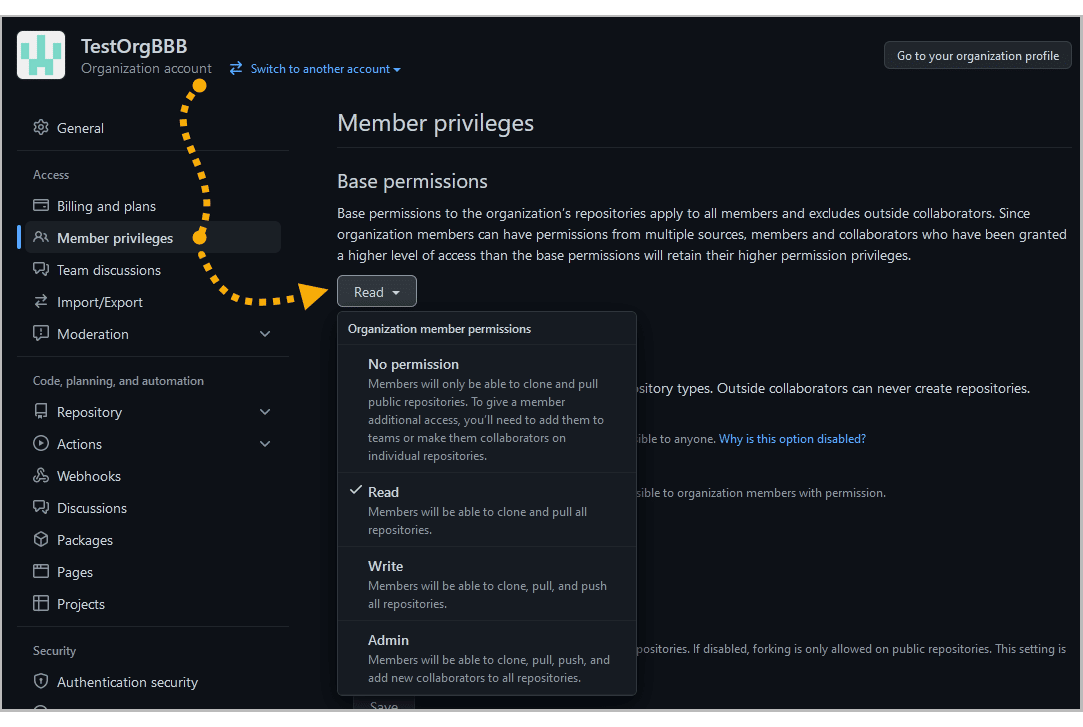
On your sidebar, click Member Privileges. The following screen is displayed.
-
Under the Base permissions, click on the dropdown button.
Choose the base permission level for organization members. The base repository permission only applies to organization members and not to outside collaborators. If the base permission is set to None, organization members will need to be given access to repositories using the Teams or Collaborators methods (see below).
-
Save the changes.
For more information, see Access Permissions on GitHub ».
Teams and collaborators
To give a member additional access, they must be added to a team or make them collaborators on individual repos.
Set default repository permission for the current team:
-
Open an organization team. (Your org ➜ Teams ➜ scroll down to the bottom then click the desired team.)
-
Click the Repositories tab.

-
Set Read, Write or Admin repository access as desired.
Assign members to a team on your GitHub repository:
-
Create a team in your GitHub Organization.
-
Invite a member to add it into the team. An email invitation is sent to that GitHub service user.
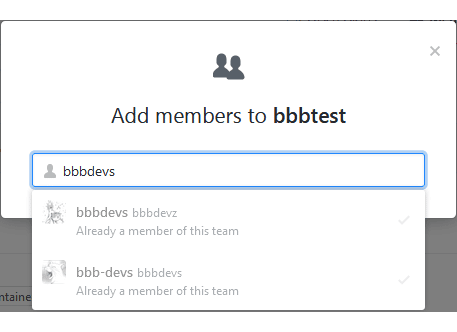
The service user is then added to the team if the invitation has been accepted.
-
Click the service user to manage permissions for this member to:
- set the desired Role for this member.
- convert this member to outside collaborator.
- give this member access to organization repositories.
- remove this member from the team.
-
Click Manage access to manage repository access for this member.

While users have configured PAT for repository access, users in a GitHub Organization must at least have Read permissions. This allows them to view commits and smart commits, and browse repositories (if enabled) of connected GitHub Organization repositories inside Jira.
For collaborators and commit authors, set these users to have Write permissions. This will allow them to view commits and smart commits, browse repositories and also enables them to create branches and pull requests to specified GitHub git repositories via developer panel of a Jira issue.
For more information on organization teams, see GitHub: Organizing Members into Teams ».
For more information on inviting collaborators, see Inviting Collaborators to a Personal/Organization Repository ».
Using Full feature integration
This process requires an existing GitHub git repository.
We recommend using the Add new integration panel (formerly Auto-connect integration) to connect multiple repositories from your GitHub.com account.
This setup uses full feature integration offering functions and features not found on single repository connections.
We strongly recommend to use personal access tokens for GitHub.com account integration.
-
On your Jira dashboard menu, go to Git ➜ Manage repositories.
-
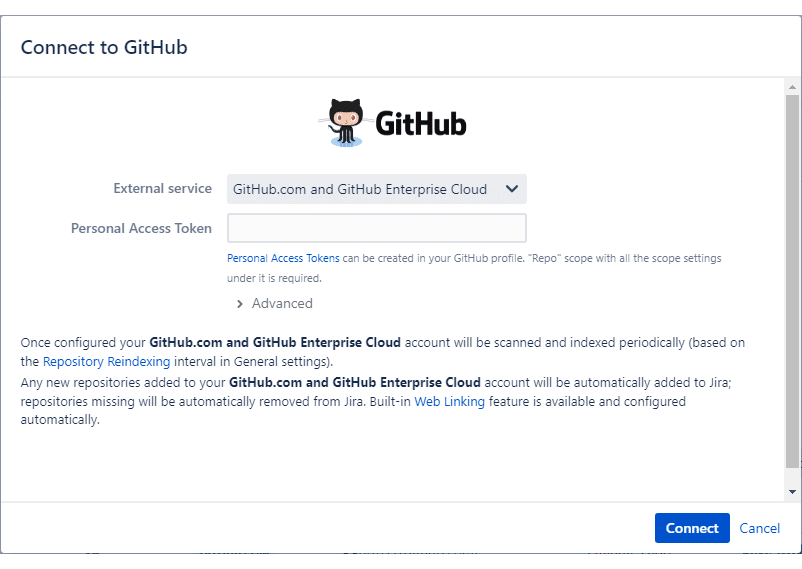
Click GitHub.com on the Add new integration panel. The Add new integration wizard dialog is displayed.
-
GitHub.com and GitHub Enterprise Cloud is selected by default. Paste the personal access token in the provided box.
-
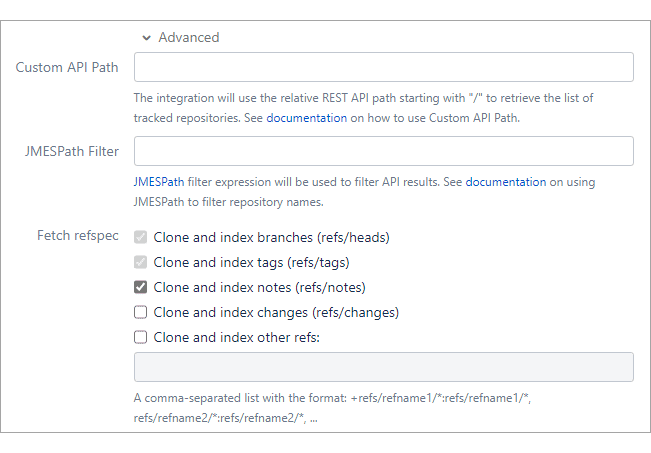
Configuring the Advanced settings is optional. However, admins/power users may set how the project listing is displayed.
-
Custom API Path – this is a relative path that starts with “/”. The maximum allowed length is 2000 characters or less. The integration will use the supported relative REST API path to retrieve the list of tracked repositories.
For more examples, see article Working with Custom API Path – GitHub.com.
-
JMESPath filter – JMESPath is a query language for JSON used to filter API results and to limit which repositories are integrated. The maximum allowed length is 2000 characters or less.
For help with writing expressions, please contact support. Read about JMESPath expressions on their website.
For some other examples, see Working with JMESPath Filter in GitHub.com.
-
Fetch refspec – Git refspecs contains patterns mapped as references from the remote to the local repository.
For more information, see Git Internals — The Refspec.-
The first two refspec options are required.
-
The rest of the options are OPTIONAL:
-
Clone and index ref notes (refs/notes) – This is a reference to
refs/notes/*used for fetching. This option is enabled by default. This affects git notes which are not shown:-
…when
refs/notesare disabled on connecting a repository. -
…when a new note comes when
refs/notesis disabled.
-
-
Clone and index changes (refs/changes) – This is a reference to
refs/changes/*used for fetching. This option is turned off by default. -
Clone and index other refs – This is a user-defined list of references used for fetching. It is a comma-separated list with the format:
+refs/refname1/*:refs/refname1/*, refs/refname2/*:refs/refname2/*, ...
-
-
-
While Custom API Path and JMESPath filter are mutually exclusive, you can use one, the other, both or neither.
-
-
Click Connect.
-
On the following screen, the Git Integration for Jira app will read all available repositories from your GitHub account. Click Import repositories.
Repositories of the logged-in GitHub user can be automatically connected to Jira Data Center. Repositories that are added or removed from GitHub will be likewise connected or disconnected from Jira Data Center.
-
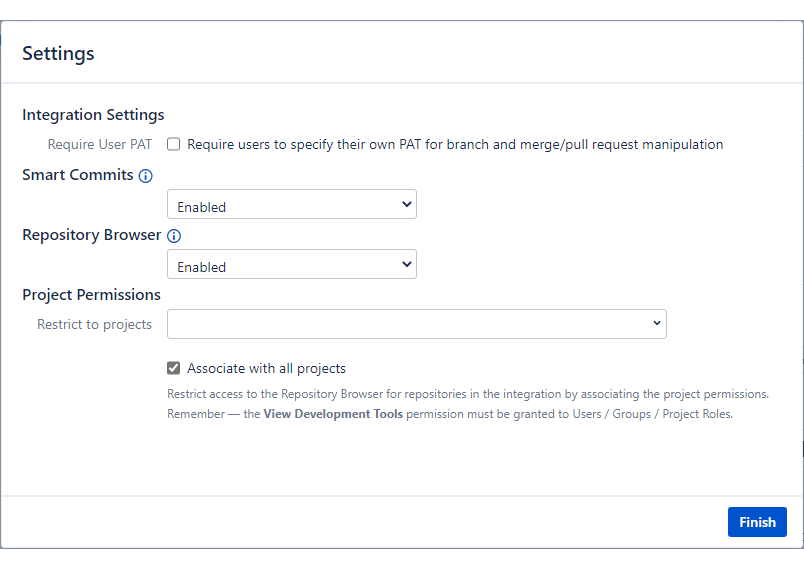
After the import process, the Settings screen is displayed.
-
On the Integration Settings, setting the Require User PAT option to
ON, will require users to provide PAT specific for branch and merge requests (via the developer panel on the Jira issue page).Personal access token
The user PAT for “Require User PAT” setting should have Write permission. Otherwise, the user will not be able to use it for branch or pull request creation/deletion.For more information on this feature, see Integration Settings: Require User PAT.
-
Set Smart Commits and Repository Browser to enable/disable these features.
-
Set Project Permissions according to your organization’s project association rules. For detailed information, see Associating project permissions.
-
-
Click Finish to complete this setup.
The GitHub.com repositories are now connected to Jira Data Center.
There will be a slight delay in adding 2FA-enabled repositories compared to others. These will show in the git configuration list eventually.
Single repository (Manual integration)
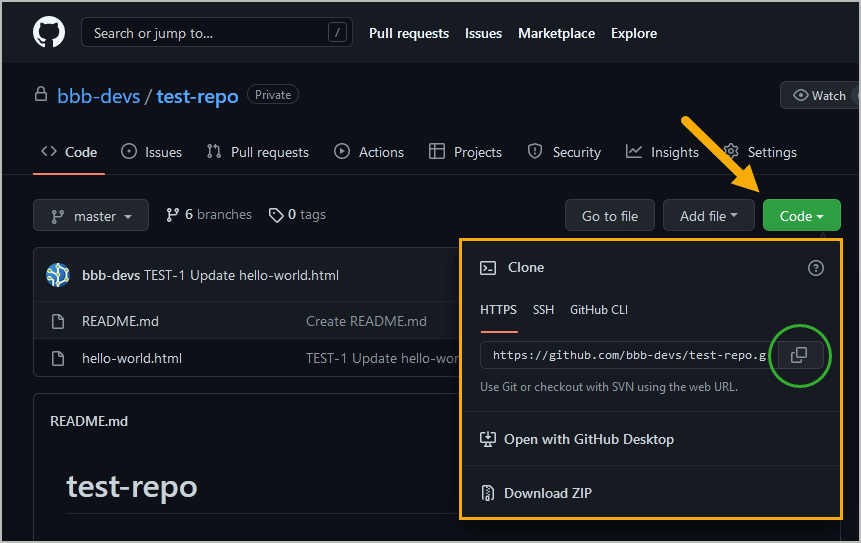
This process requires an existing GitHub git repository. Look for the GitHub repository URL on the repository project page.
Choose between SSH or HTTPS. Use this information to connect the GitHub git repository to your Jira Data Center via Git Integration for Jira app:
-
On your Jira dashboard menu, go to Git ➜ Manage repositories.
-
Click Connect to Git Repository (or click the Git icon on the Add new integration panel) to open the Connect Wizard.
-
Paste the URL from GitHub in the provided box.
-
Continue to the next step by following the screen instructions.
-
Click Finish to complete this process.
The repository is now connected to Jira Data Center.
Setting up GitHub web links
The Git Integration for Jira app automatically configures web linking for GitHub git repositories.
For single repository connections, web link setup is optional. However, git links will become available in Git Commits tab when configured.
For more information on this feature, see Documentation: Web linking.
Viewing git commits in Jira Data Center
-
Perform a git commit by adding the Jira issue key in the commit message. This will associate the commit to the mentioned Jira issue.
-
Open the Jira issue.
-
Scroll down to the Activity panel then click the Git Commits tab.
-
Click View Full Commit to view the code diff.
For more information about this feature, see Documentation: Viewing commit code diffs.
Require User PAT settings for user access
For teams looking to maintain user attribution, Jira administrators can place a requirement where individual Jira users must provide personal access tokens to perform certain actions. This includes actions such as creating a branch or pull request in Jira using their git service account – rather than the integration account.
For more information, see Require personal access tokens for user access.
If the Require User PAT option is enabled in the Integration Feature Settings and a user PAT isn’t configured yet for the selected repository via Repository Browser, a text label about setting up your PAT is displayed on the create branch and create pull/merge request dialogs.
Click this text label to open the Setup PAT dialog and paste your personal access token in the provided box. Click Update.
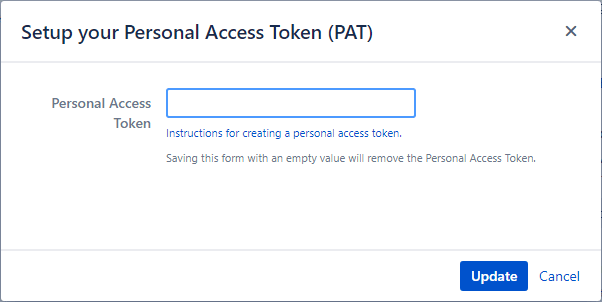
The Setup PAT dialog is also accessible via Repository Browser (dashboard menu Git ➜ Repository browser) ➜ Click the ![]() icon under Pers. Access column.
icon under Pers. Access column.
Working with branches and pull requests
This process requires a GitHub git repository and a PAT with repo scopes.
For GitHub Organization, the user must have the Write permissions and the repo PAT scopes.
Default branch
Most git integrations allow changing of the default branch of the repository/project other than “master”. This change is reflected in the Repository Settings of the Git Integration for Jira app on the next reindex. Full integration supports this function where Git Integration for Jira app gets the default branch from almost all integrations and apply this setting at repository level.
Creating branches
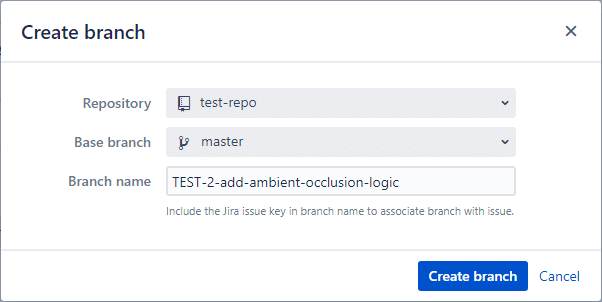
On your Jira Data Center, open a Jira issue. On the Jira developer panel under Git Integration, click Create branch. The following dialog is displayed.
Pointers:
-
Select a Repository from the list.
If there are several repositories with the same name, the listed GitHub repositories will have their names attached with a GitHub organization name. For example,
BigBrassBand/second-webhook-test-repo. -
Use the search box to look for the specific repository that will be used.
-
Choose a Base branch.
-
Enter a Branch name or leave it as is (recommended).
The newly-created branch is now listed in the developer panel under Branches. Perform a commit to the newly-created branch to be ready for merge.
Creating pull requests
The pull request feature works the same as merge request. On your Jira Data Center, open the Jira issue where your previously created a branch. On the developer panel under Git Integration, click Create pull request. The following dialog is displayed.
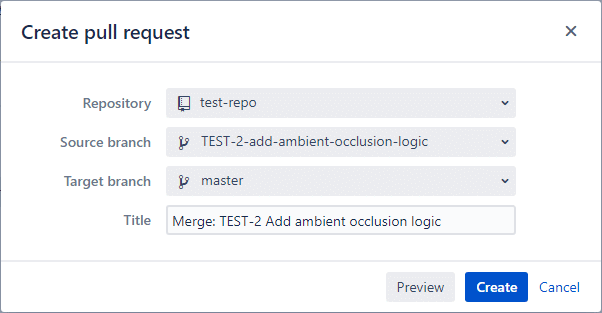
Pointers:
-
Select a Repository from the list.
If there are several repositories with the same name, the listed GitHub repositories will have their names attached with a GitHub organization name. For example,
BigBrassBand/second-webhook-test-repo. -
Use the search box to look for the specific repository that will be used.
-
Choose the newly-created branch as the Source branch.
-
Set master as the Target branch.
-
Enter a descriptive Title or leave it as is (recommended).
The pull request is listed on the developer panel of the Jira issue page.
The pull request is also ready for approval by the reviewers in your GitHub web portal.
How to enable GetRepositories log response from GitHub to the Jira log?
-
Open
 Jira System Administration then click Logging and profiling on the left sidebar.
 -
Under the Default loggers section, click Configure….
-
Set the Package name to
com.bigbrassband.jira.git.services.integration. -
Set Logging Level to DEBUG.
-
Click Add to proceed.
IMPORTANT! Remember to turn this setting off after you have obtained the log file for analysis.
More Integration Guides
GitHub.com (this page)
GitHub Enterprise Server (Git Integration for Jira Data Center/Server)
GitHub App integration (Git Integration for Jira Data Center/Server)
GitLab.com (Git Integration for Jira Data Center/Server)
GitLab CE/EE (Git Integration for Jira Data Center/Server)
Azure DevOps | Visual Studio Team Services (VSTS) (Git Integration for Data Center/Jira Server)
Azure DevOps Server | Team Foundation Services (TFS) (Git Integration for Jira Data Center/Server)
AWS CodeCommit (Git Integration for Jira Data Center/Server)
Gerrit (Git Integration for Jira Data Center/Server)
Bitbucket Server (Git Integration for Jira Data Center/Server)
Bonobo (Git Integration for Jira Data Center/Server)
Windows Network | Server Share (Git Integration for Jira Data Center/Server)
Tracked Folders (Git Integration for Jira Data Center/Server)
Back to: Integration basics (Git Integration for Jira Data Center/Server)
