
Integrate AWS CodeCommit with Jira Cloud
AWS CodeCommit is a git host service by Amazon Web Services to store and manage source code, related files and private Git repositories in the cloud.
Quickly learn how to connect AWS CodeCommit git repositories via Git Integration for Jira Cloud.
Required permissions
IMPORTANT
The permissions detailed in the connect/Full feature integrations wizard are necessary for specific features to work.
We recommend that the following AWS IAM policies are configured beforehand based on what features that will be used.
Configure AWSCodeCommitReadOnly » IAM policy for basic features:
| Feature | Required Permission |
|---|---|
| show commits, process smart commits, show branches | codecommit:ListRepositoriescodecommit:GitPullcodecommit:BatchGetRepositories |
| show pull requests | codecommit:ListPullRequestscodecommit:GetPullRequest |
Configure AWSCodeCommitPowerUser » IAM policy for all features:
| Feature | Required Permission |
|---|---|
| create pull request | codecommit:CreatePullRequest |
| create branch | codecommit:CreateBranch |
| delete branch | codecommit:DeleteBranch |
| configure webhooks automatically | codecommit:GetRepositoryTriggerscodecommit:PutRepositoryTriggerssns:CreateTopicsns:DeleteTopicsns:Subscribe |
See this article for related information.
Webhooks and Triggers
RECOMMENDED
CodeCommit doesn’t have webhooks but it has SNS triggers requiring a subscription confirmation ».
With an existing AWS CC repository, enable triggers then create an SNS topic and subscribe to that topic.
For more information on Amazon SNS, see Amazon SNS: Getting Started ».
Using Git service integration
This process requires an AWS account with existing CodeCommit repositories.
We recommend using the Full feature integrations panel (formerly Auto-connect integration panel) to connect multiple repositories from your AWS CodeCommit git host.
To connect your repository to Jira thru the Git Integration for Jira app, open the Add new integration wizard:
-
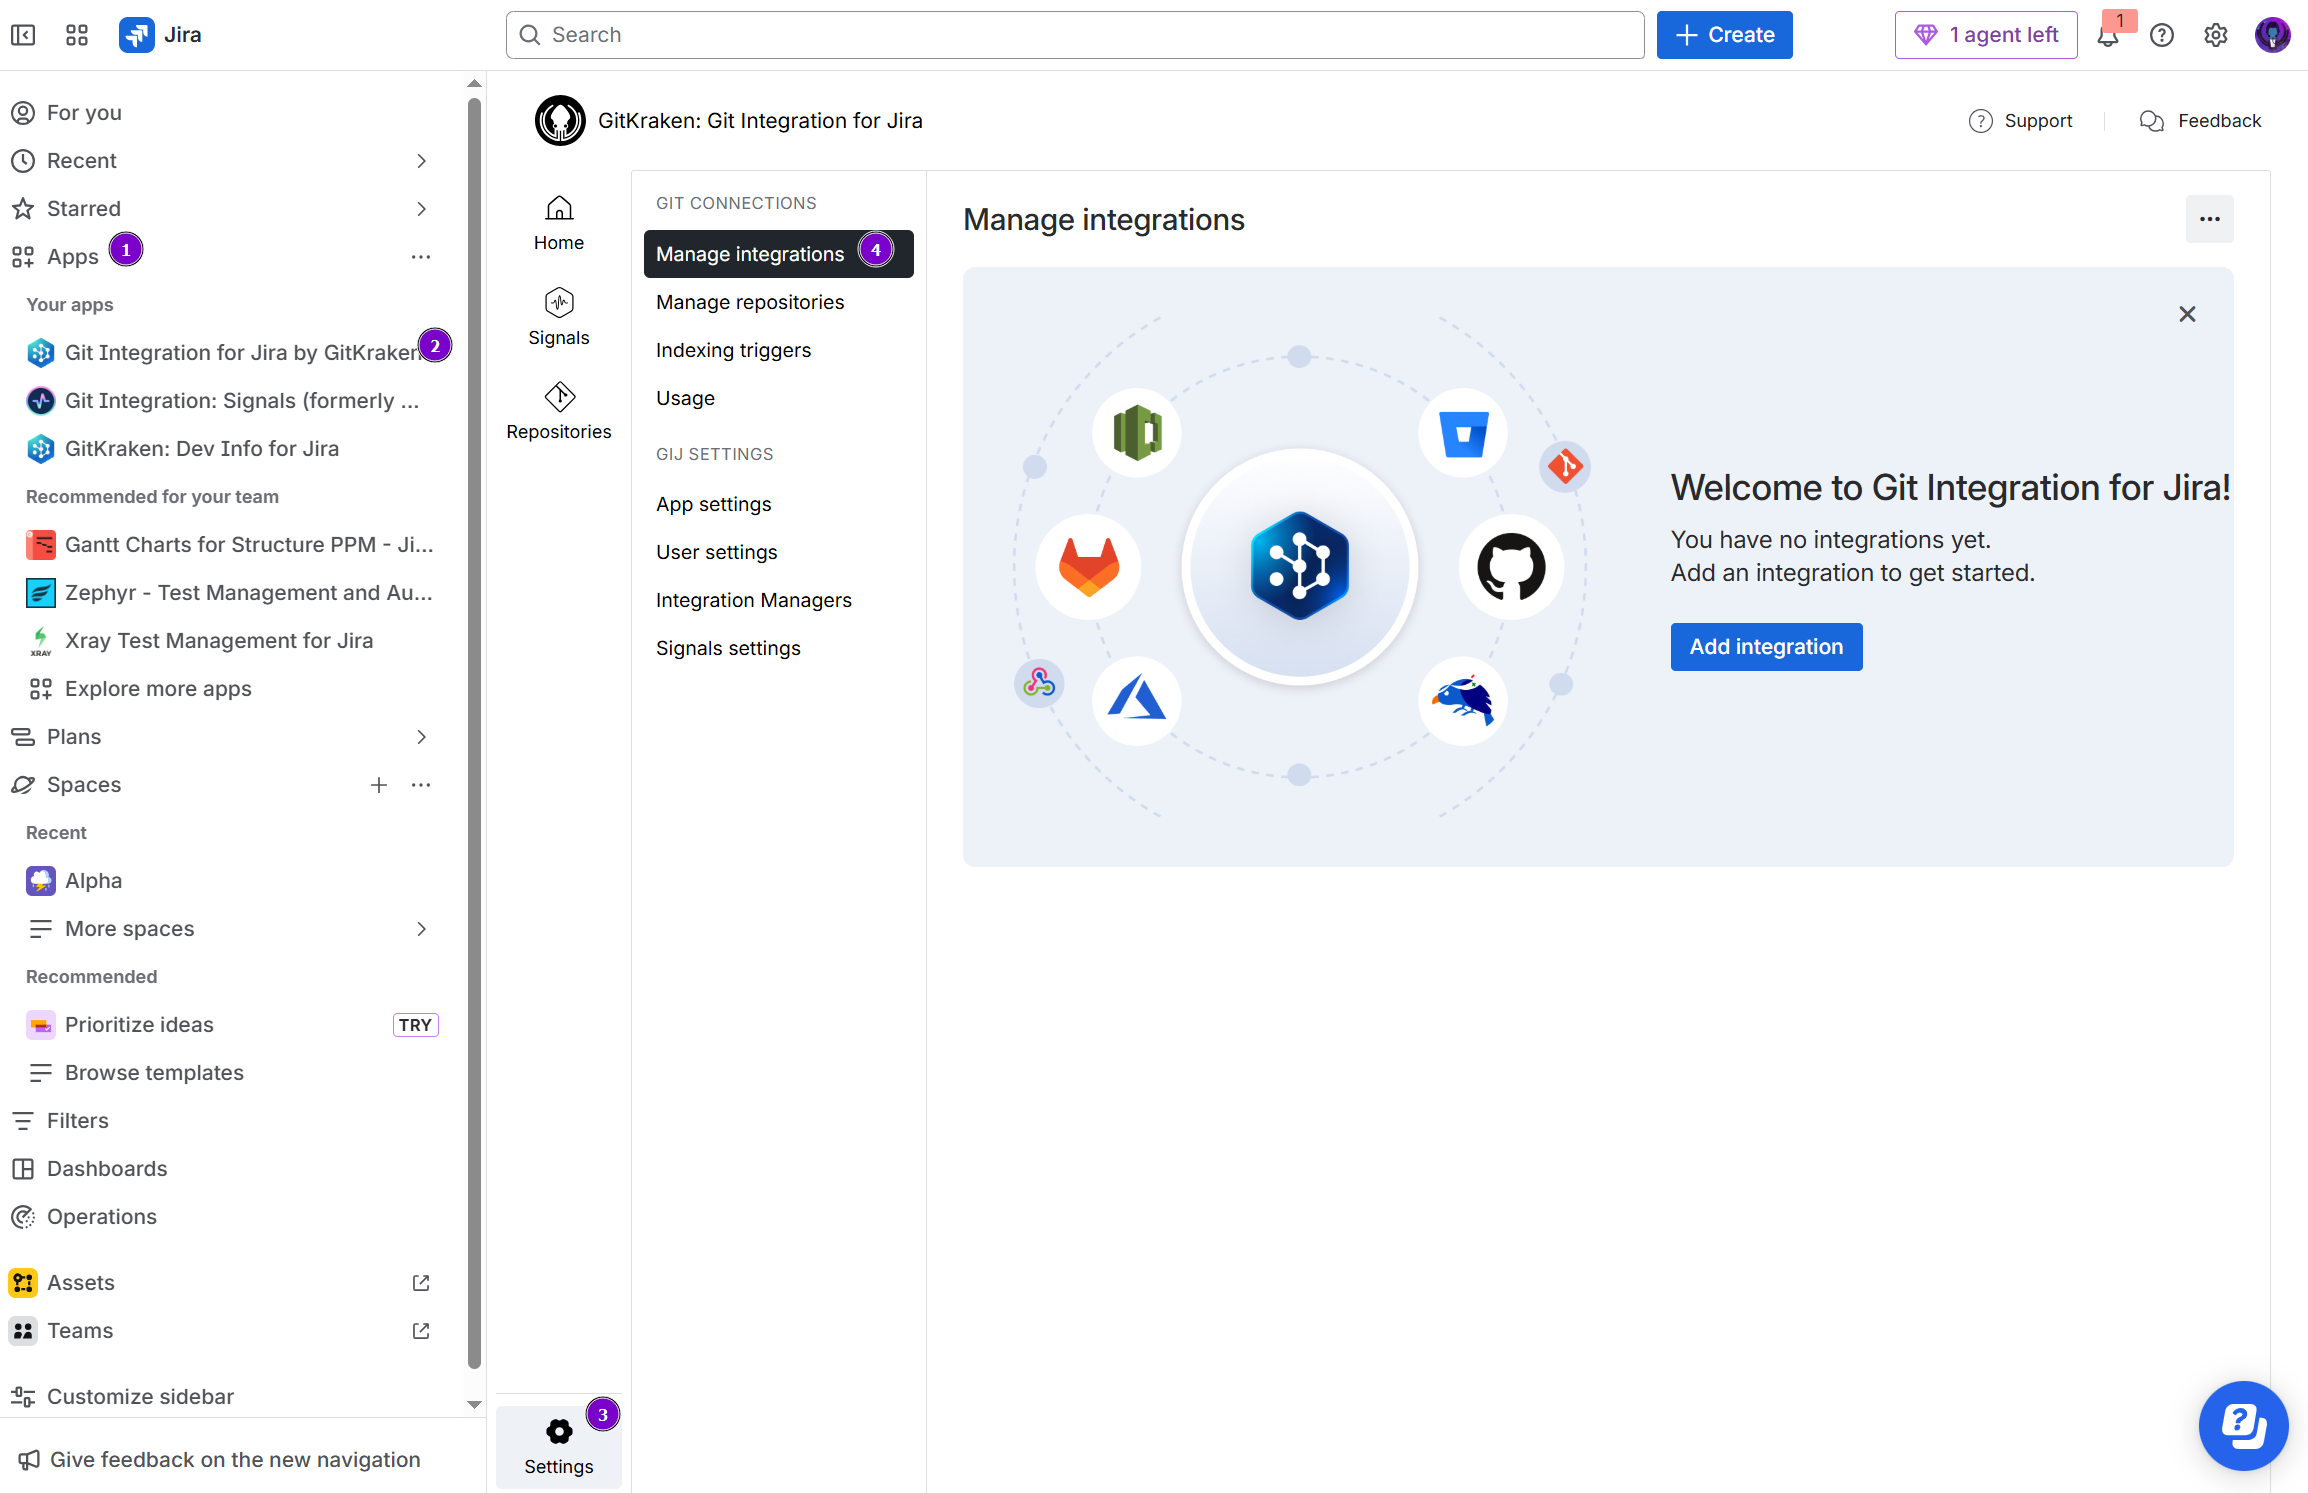
On your Jira side bar, go to Apps ➜ Git Integration for Jira, then Settings ➜ Manage Integrations
-
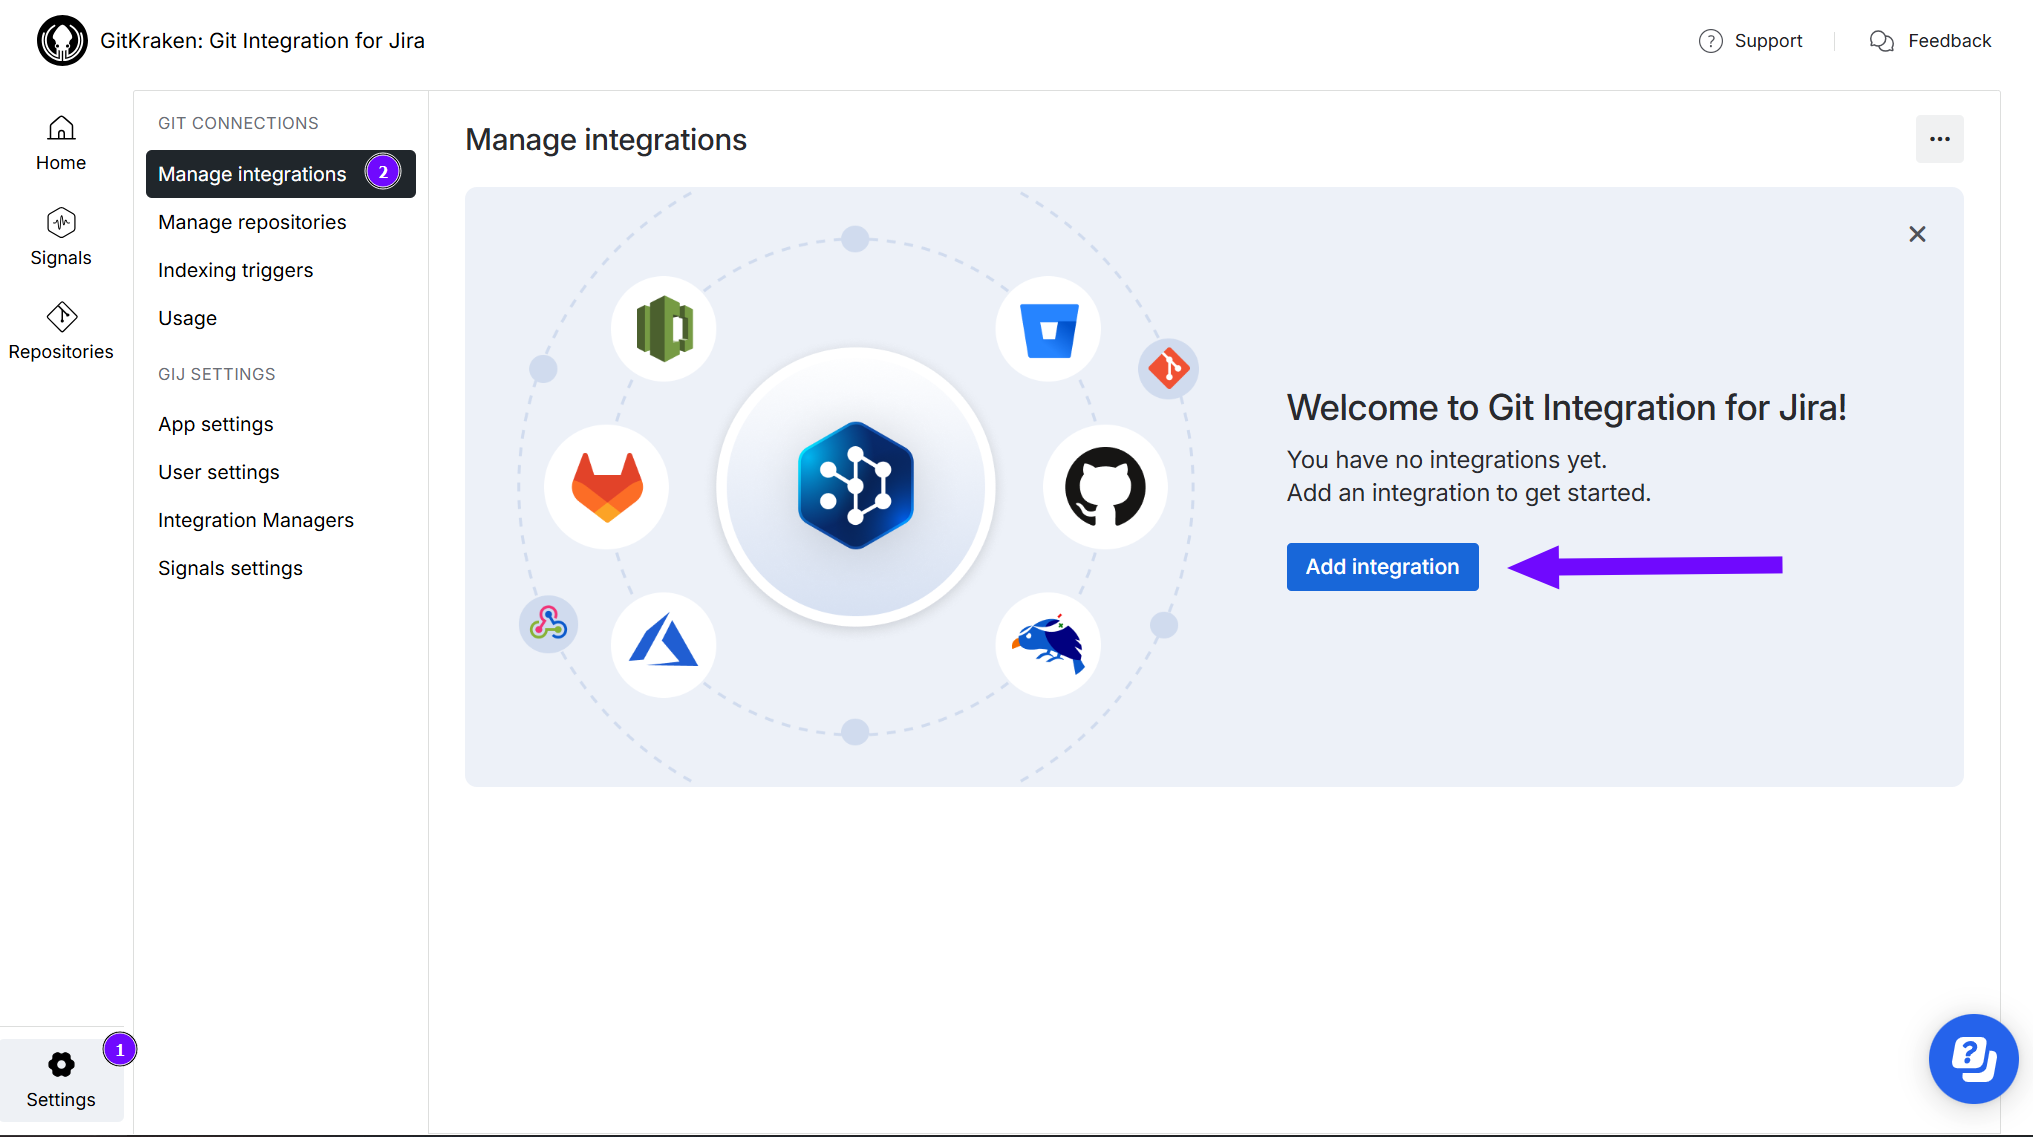
On the Manage integrations page, click Add integration.
-
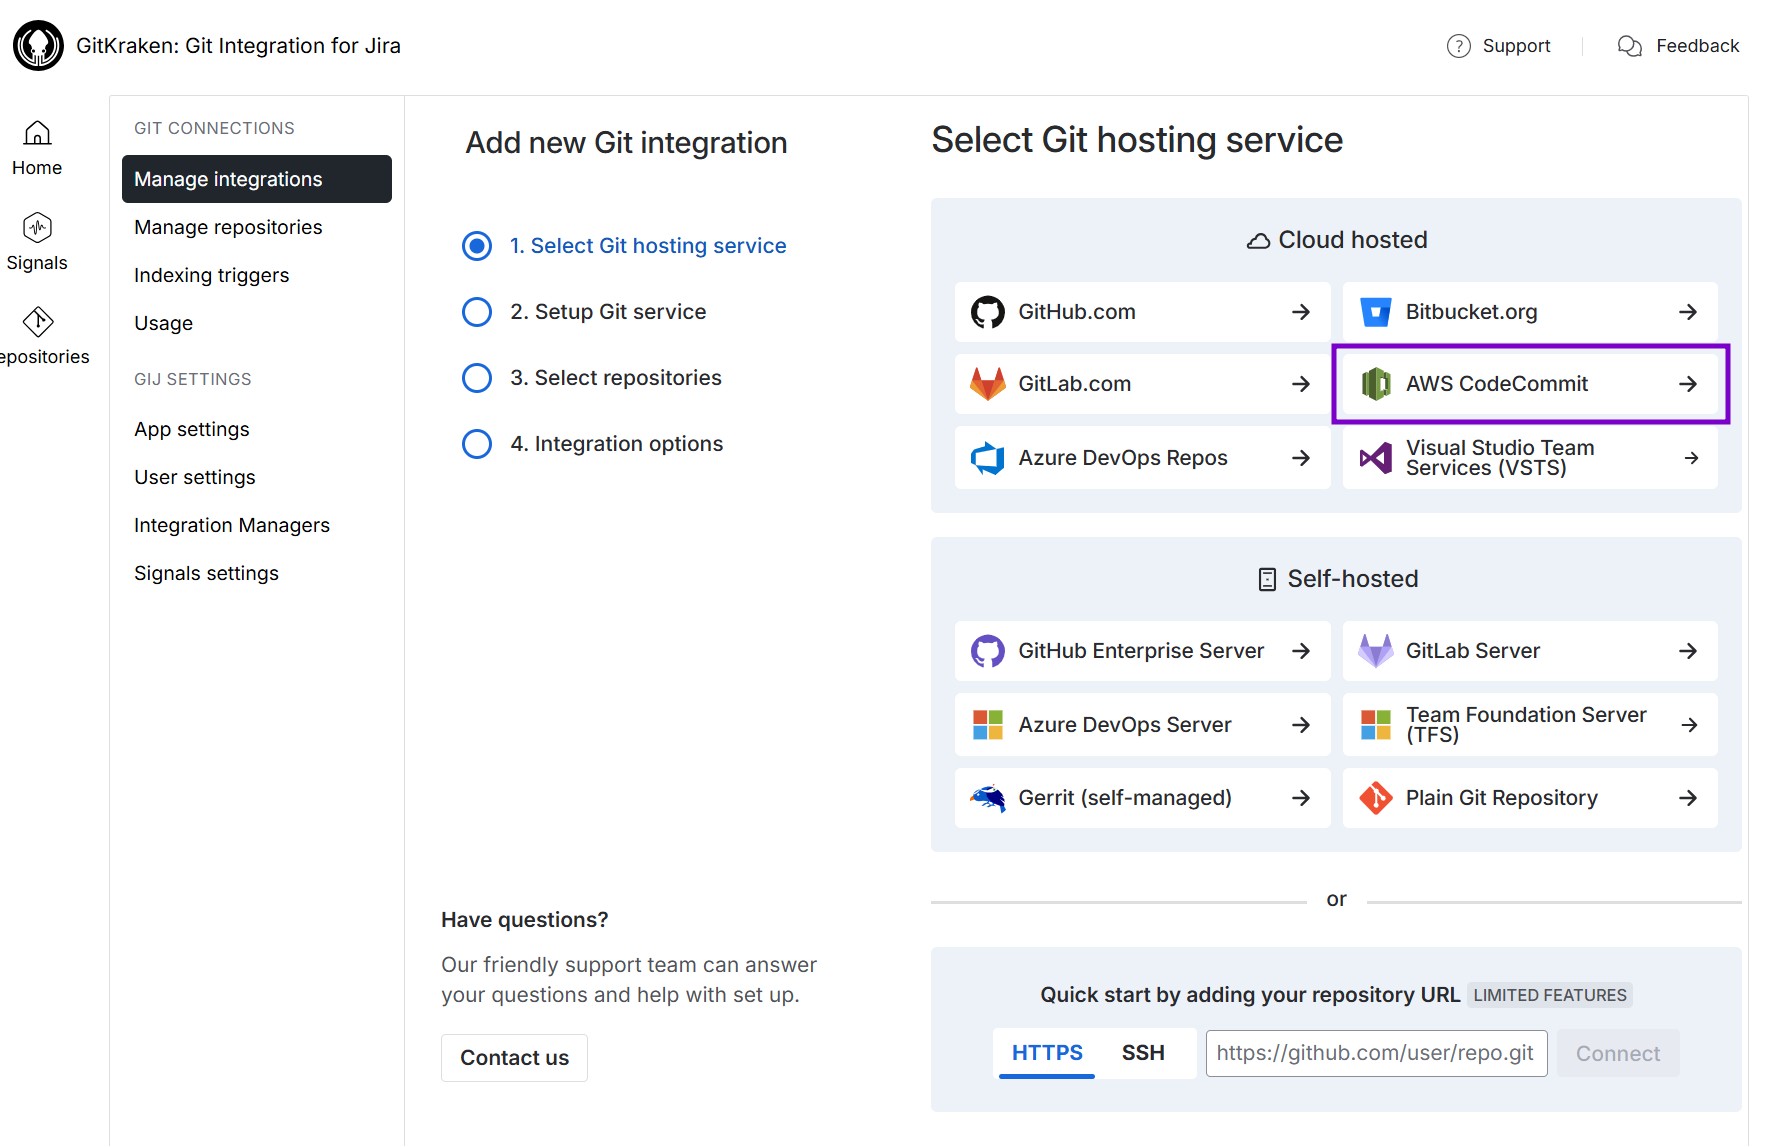
For the following screen, click AWS CodeCommit to start integration with this git service.
-
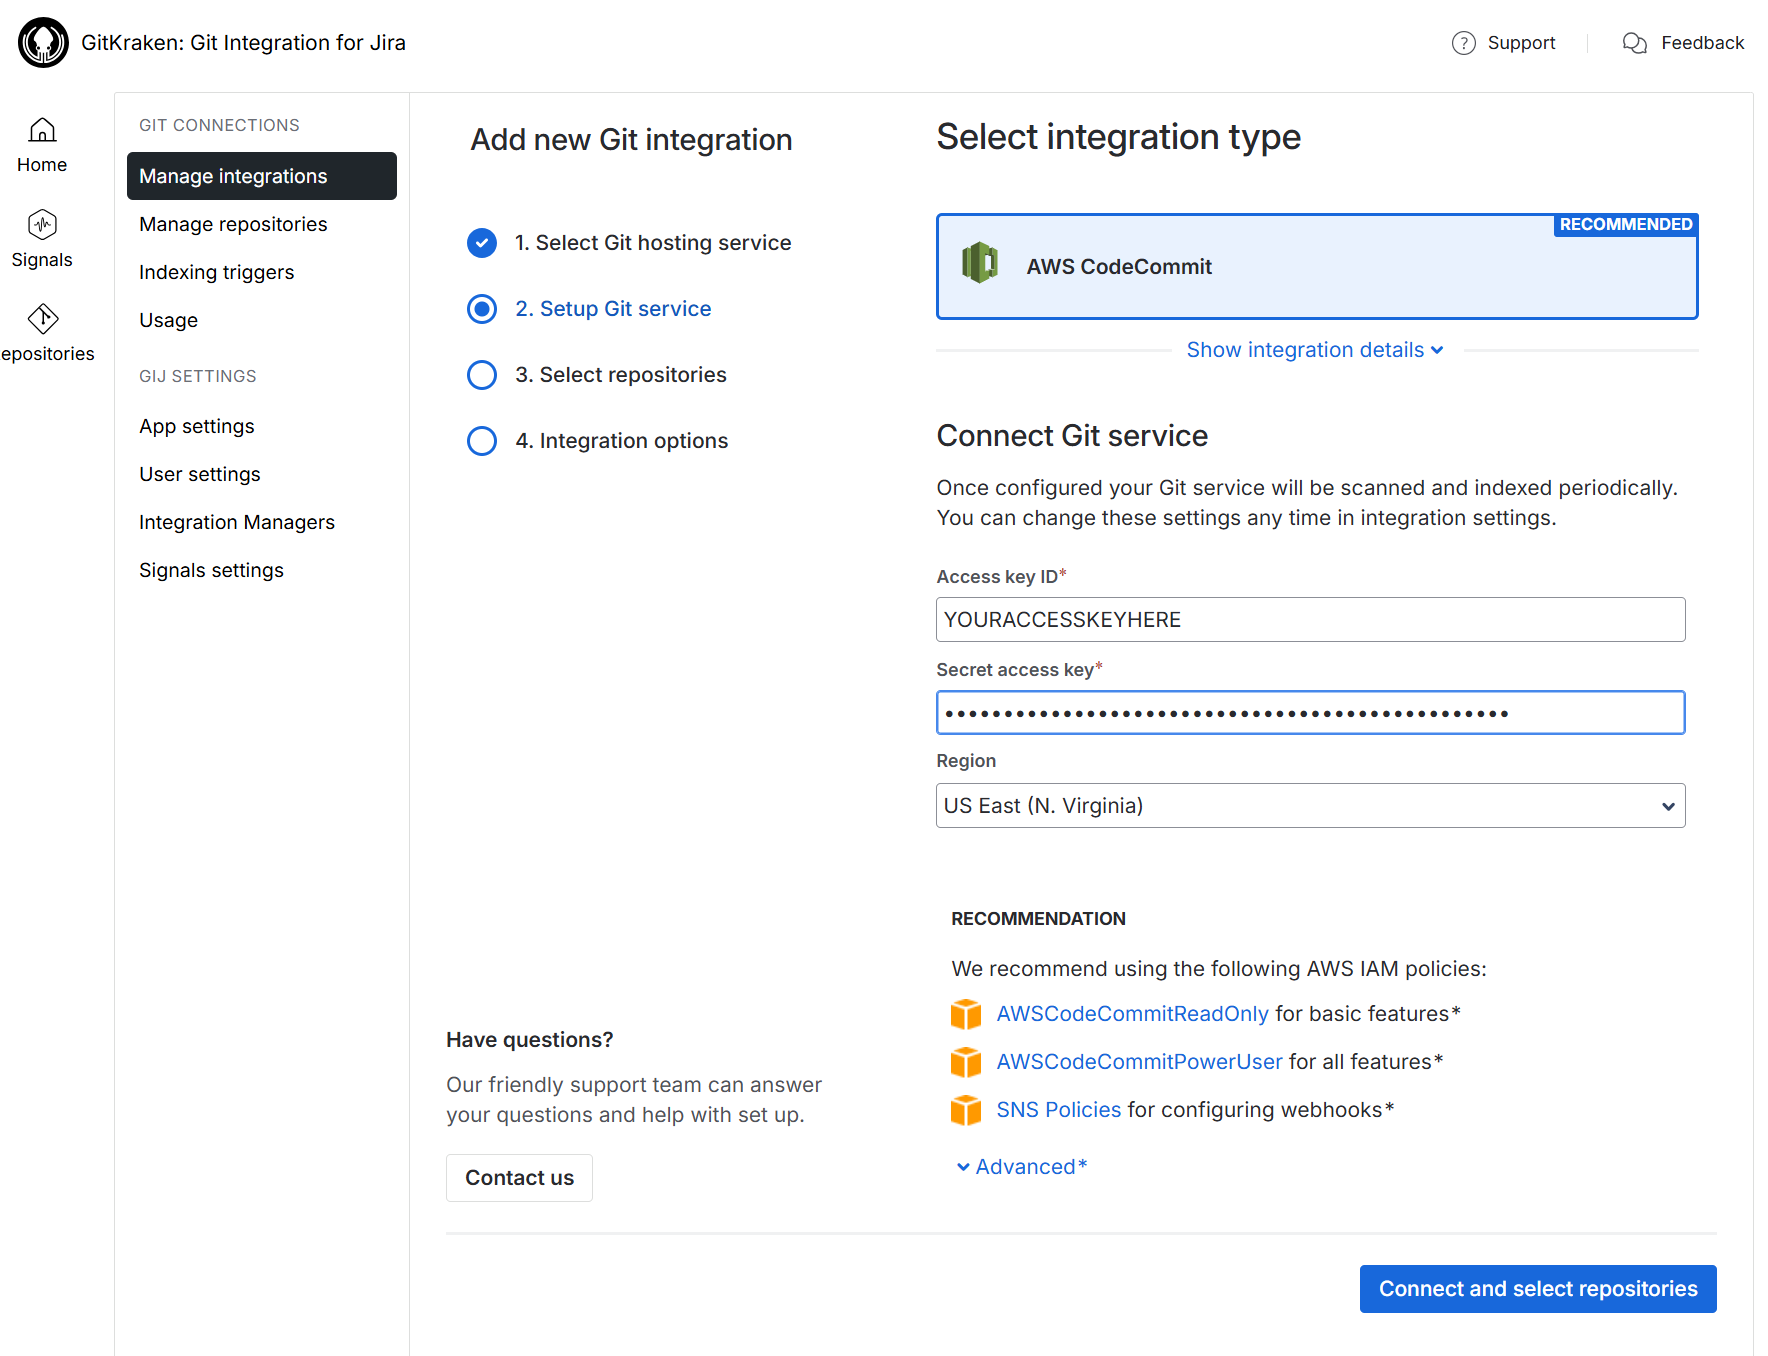
On the following screen, proceed to enter information on the provided field boxes.
-
Enter the Access key ID and the Secret access key in their respective fields.
-
Select the Region where the CodeCommit repositories reside. See below for the supported regions:
- AWS GovCloud (US)
- AWS GovCloud (US-East)
- US East (N. Virginia)
- US East (Ohio)
- US West (N. California)
- US West (Oregon)
- EU (Ireland)
- EU (London)
- EU (Paris)
- EU (Frankfurt)
- EU (Stockholm)
- EU (Milan)
- Asia Pacific (Hong Kong)
- Asia Pacific (Mumbai)
- Asia Pacific (Singapore)
- Asia Pacific (Sydney)
- Asia Pacific (Jakarta)
- Asia Pacific (Tokyo)
- Asia Pacific (Seoul)
- Asia Pacific (Osaka)
- South America (Sao Paulo)
- China (Beijing)
- China (Ningxia)
- Canada (Central)
- Middle East (Bahrain)
- Africa (Cape Town)
- US ISO East
- US ISOB East (Ohio)
- US ISO West
-
-
Click Connect and select repositories to continue. On the following screen, the Git Integration for Jira Cloud app will read all available repositories from your AWS CodeCommit account.
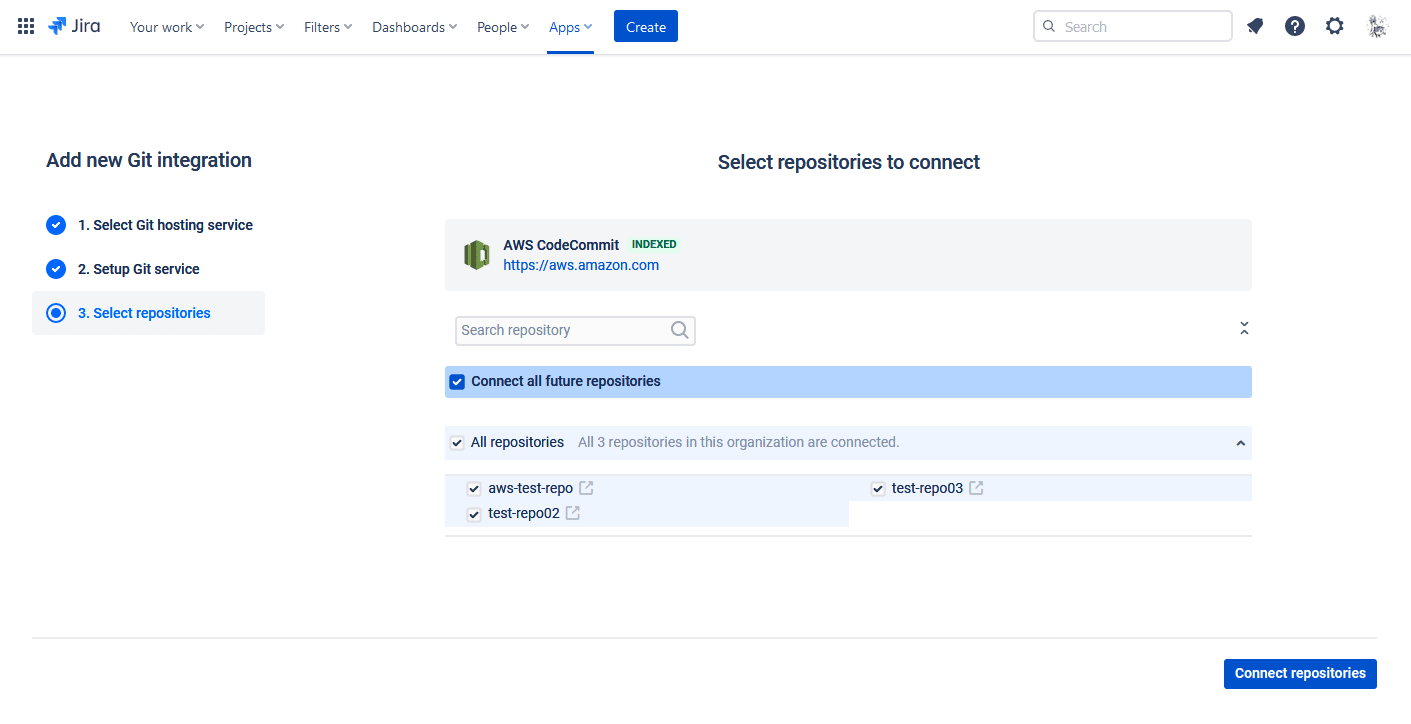
- Select one or more repositories to connect to your Jira Cloud instance.
- Repositories of the logged-in AWS CodeCommit user can be automatically connected to Jira Cloud. Repositories that are added or removed from AWS CodeCommit will be likewise connected or disconnected from Jira Cloud.
-
Click Connect repositories to complete this setup.
The AWS CodeCommit repositories are now connected to Jira Cloud.
If the connected git host has newly added repositories, the Git Integration for Jira app will automatically add them to the git repositories configuration on the next reindex.
Single repository (Manually connect via HTTP/HTTPS)
Connect a single AWS CodeCommit repository manually to Jira via HTTP/HTTPS connection.

Use the HTTP/HTTPS git clone URL from your AWS CodeCommit repository project page. Click on the HTTPS (Clone URL column – column 1) and use this for single git repository integrations with Git Integration for Jira cloud app.
Single git repository integration (HTTPS)
The repository is now connected to Jira Cloud.
Single repository (Manually connect via SSH)
Connect a single AWS CodeCommit repository manually to Jira via SSH connection.

Use the SSH git clone URL from your AWS CodeCommit repository project page. Click on the SSH (Clone URL column – column 2) and use this for single git repository integrations with Git Integration for Jira cloud app.
Single git repository integration (SSH)
The repository is now connected to Jira Cloud.
SSH connections are handled automatically if the PUBLIC KEY was added in the AWS IAM console and the associated PRIVATE KEY was added/uploaded on the Jira side (Manage repositories page ➜
If authentication issues are encountered during connecting an AWS repository to Jira, modify the original URL by inserting the SSH Key ID as the username. The SSH Key ID is an alphanumeric sequence provided by AWS IAM when importing a PUBLIC KEY for a particular user account in IAM.
For example, the original URL is:
ssh://git-codecommit.us-east-1.amazonaws.com/v1/repos/test-repoIf the SSH Key ID 1a2b3c4d5e is applied to the original SSH URL, the resulting URL would be:

The modified URL can now be used as a valid repository URL via Manage repositories page ➜ Add integration ➜ Single git repository integration panel.
Troubleshooting integration
Some repositories are not showing for the integration user. If this is the case, make adjustments to the configuration on the following settings:
- Permissions – verify correct permissions have been granted to the integration user.
For detailed information, see Required permissions.
Setting up AWS CodeCommit web links
The Git Integration for Jira app automatically configures web linking for AWS CodeCommit repositories connected via Git service integration in Jira Cloud.
For single repository connections, configuring web linking is optional. For more information, see Web linking documentation.
Viewing git commits in Jira Cloud
-
Perform a git commit by adding the Jira issue key in the commit message. This will associate the commit to the mentioned Jira issue.
-
Open the Jira issue.
-
Scroll down to the Activity panel then click the Git Commits tab.
-
Click View Full Commit to view the code diff.
For detailed information on this process, see Linking git commits to Jira issues.
Working with branches and pull requests
The Git Integration for Jira app supports creation of branches and pull requests from Jira via the developer panel.
Default branch
Most git integrations allow changing of the default branch of the repository/project other than “master”. This change is reflected in the Repository Settings of the Git Integration for Jira app on the next reindex. Full feature integrations support this function where Git Integration for Jira app gets the default branch from almost all integrations and apply this setting at repository level.
Creating branches
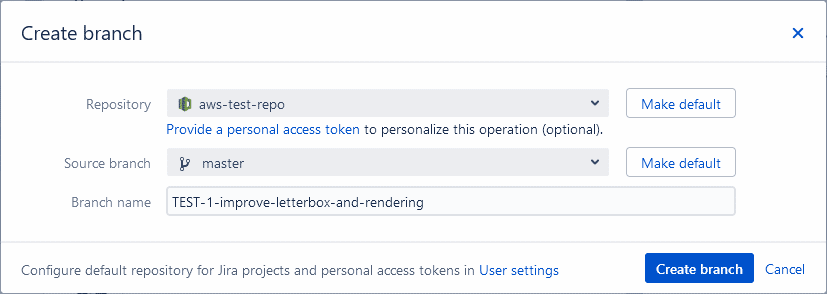
On your Jira Cloud, open a Jira issue. On the Jira Git development panel, click Open Git Integration then click Create branch. The following dialog is displayed.
Pointers:
-
Select a Repository from the list.
-
The selected repository will display the git service logo to identify which git host it is located from.
-
If there are several repositories with the same name, the listed CodeCommit repositories will have their names attached with a region name. For example,
us-west-2/test-repo. -
Use the search box to look for the specific repository that will be used.
-
OPTIONAL Designate the repository to be the default selected repository for current Jira project. To configure default repositories for more than one Jira project – use the User settings page.
-
-
Choose a Source branch. OPTIONAL Designate the branch to be the default selected branch for the currently selected repository. To configure default branches for more than one repository – use the User settings page.
-
Enter a Branch name or leave it as is (recommended).
-
Click Create branch to complete this process.
The newly-created branch is now listed in the Jira git development panel under Branches. Perform a commit to the newly-created branch to be ready for merge.
The branch is also created and can be viewed under the Branches tab in your AWS CodeCommit web portal.
Creating pull requests
The pull request feature works the same as merge request.
On your Jira Cloud, open the Jira issue where your previously created a branch. On the developer panel under Git integration, click Create Pull Request. The following dialog is displayed.

Pointers:
-
Select a Repository from the list.
-
The selected repository will display the git service logo to identify which git host it is located from.
-
If there are several repositories with the same name, the listed CodeCommit repositories will have their names attached with a region name. For example,
us-west-2/test-repo. -
Use the search box to look for the specific repository that will be used.
-
OPTIONAL Designate the repository to be the default selected repository for current Jira project. To configure default repositories for more than one Jira project – use the User settings page.
-
-
Choose the newly-created branch as the Source branch. OPTIONAL Designate the branch to be the default selected branch for the currently selected repository. To configure default branches for more than one repository – use the User settings page.
-
Set master as the Target branch.
-
Enter a descriptive Title or leave it as is (recommended).
-
Click Create pull request to complete this setup.
The pull request is listed on the developer panel of the Jira issue page.
The pull request is also ready for approval by the reviewers in your AWS CodeCommit web portal.
The branch and the pull request status are also displayed on the developer panel.
More Integration Guides
GitHub.com (Git Integration for Jira Cloud)
GitHub Enterprise Server (Git Integration for Jira Cloud)
GitLab.com (Git Integration for Jira Cloud)
GitLab CE/EE (Git Integration for Jira Cloud)
Azure DevOps | Visual Studio Team Services (VSTS) (Git Integration for Jira Cloud)
Azure DevOps Server | Team Foundation Services (TFS) (Git Integration for Jira Cloud)
AWS CodeCommit (Git Integration for Jira Cloud)
Gerrit (Git Integration for Jira Cloud)
Bitbucket Cloud (Git Integration for Jira Cloud)
Introduction to Git integration (Git Integration for Jira Cloud)
Last updated: December 2025
